Compra Fox D4026 - Morsa da falegname a prezzi vantaggiosi su

Brand:Woodstock

3.4/5

221.78

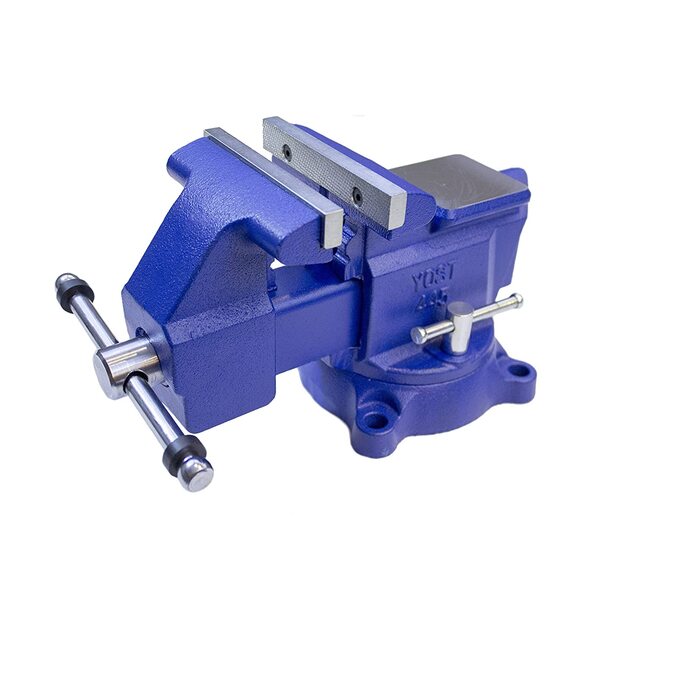
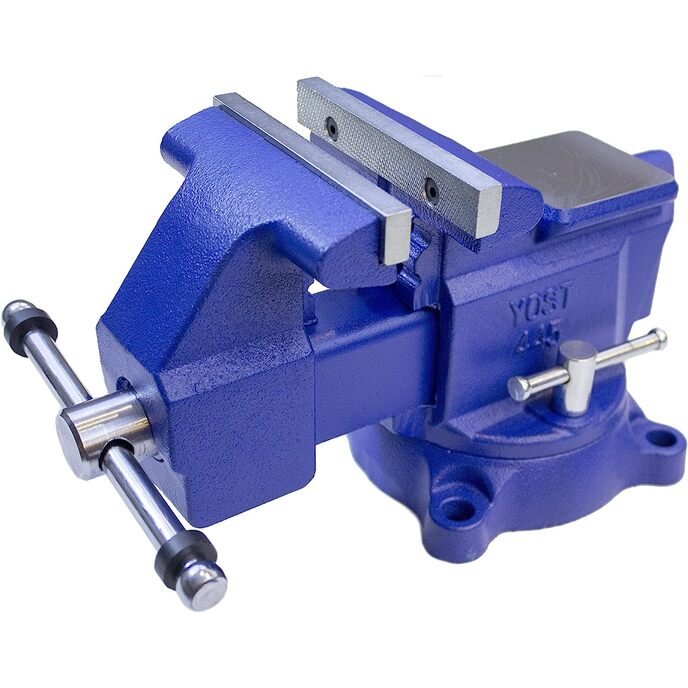
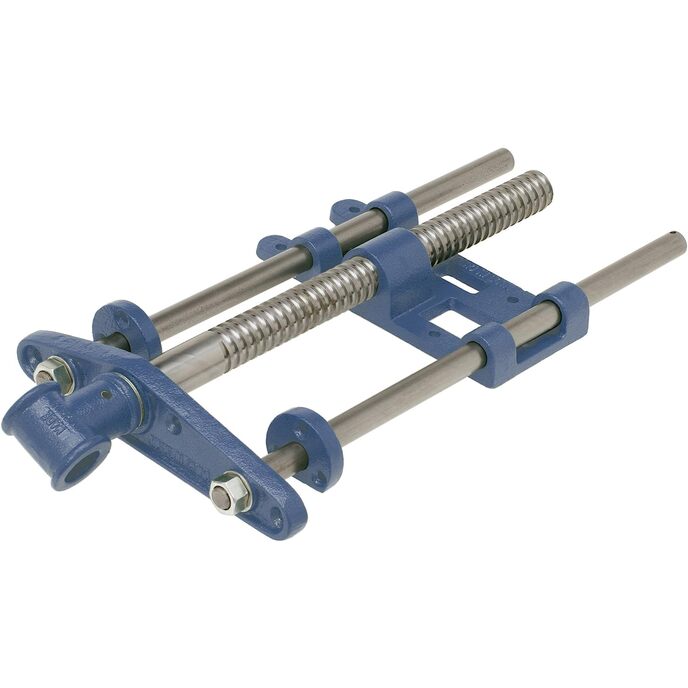
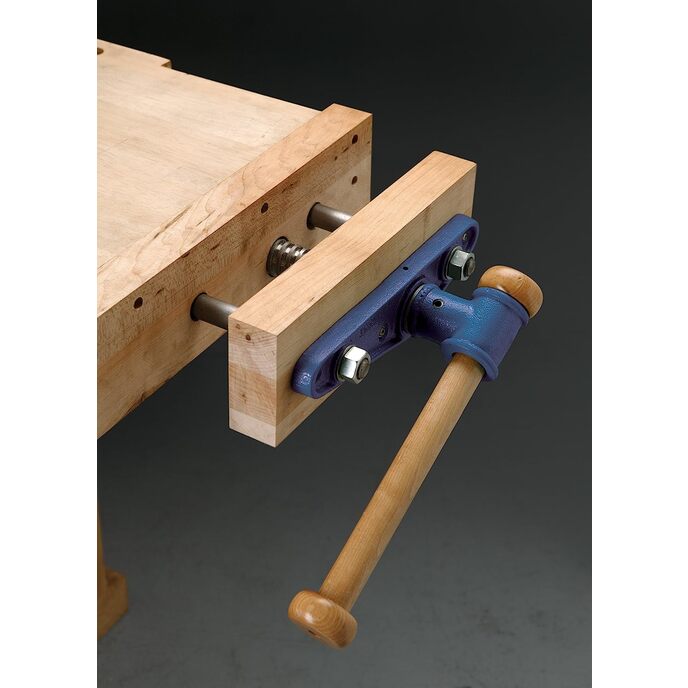
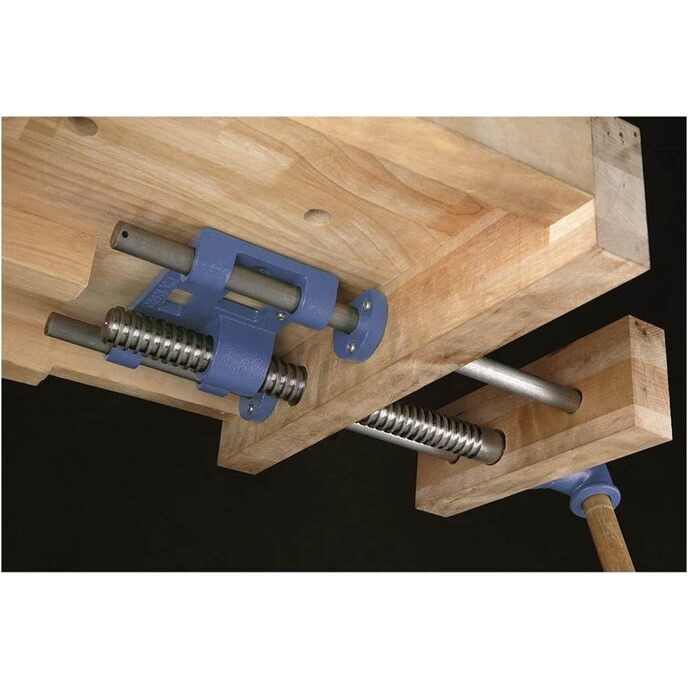
DESCRIZIONE PRODOTTO Se stai costruendo la tua panca da falegname, questa morsa frontale in acciaio e ghisa per impieghi gravosi ha tutto l'hardware funzionante per una morsa da banco molto robusta e di grande capacità. Aggiungi semplicemente la tua mascella in legno, manico in legno e hardware di montaggio. La dimensione complessiva è lunga 19-1/4 pollici e larga 10-1/4 pollici. La dimensione della vite è di 1-3/16 pollici di diametro per 15-1/2 pollici di lunghezza. DAL PRODUTTORE Se stai costruendo la tua panca da ebanista, questa morsa frontale in acciaio e ghisa per impieghi gravosi ha tutto l'hardware funzionante per una morsa da banco molto robusta e di grande capacità. Aggiungi semplicemente la tua mascella in legno, manico in legno e hardware di montaggio. La dimensione complessiva è lunga 19 1/4 pollici e larga 10 1/4 pollici. La dimensione della vite è di 1 3/16 pollici di diametro per 15 1/2 pollici di lunghezza.

Diametro vite 1-3/16 pollici. Lunghezza vite 15-1/2 pollici. 10-1/4 pollici di larghezza. 19-1/4 pollici di lunghezza.
Batteries Required? ‎No
Brand Woodstock
Color Blue Metallic
Color ‎Blue Metallic
Country of Origin ‎China
Customer Reviews 4.3 4.3 out of 5 stars 286 ratings 4.3 out of 5 stars
Domestic Shipping Item can be shipped within U.S.
International Shipping This item can be shipped to select countries outside of the U.S. Learn More
Item Dimensions LxWxH 22.8 x 11 x 3.7 inches
Item model number ‎D4026
Item Package Quantity ‎1
Item Weight 19.47 Pounds
Item Weight ‎19.47 pounds
Manufacturer ‎WOODSTOCK
Material Cast Iron
Material ‎Cast Iron
Part Number ‎D4026
Product Dimensions ‎22.8 x 11 x 3.7 inches
Style Modern
Style ‎Modern
Warranty Description ‎1-Year Warranty

3.4

10 Review
5 Star
56
4 Star
29
3 Star
8
2 Star
4
1 Star
3

Scrivi la tua recensione

La tua mail non sarà pubblicata. Tutti i campi obbligatori sono segnati con*

Scritto da: GSinBaltimore
a pretty good choice for workholding
For the money, a pretty good choice for workholding. Operation is smooth, and it solidly grabs whatever I put in it. It does rack a bit, but then all vises of this type do that, even those costing 2-3 times as much. Installation went pretty much the way others have explained. I used a 7/8" forstner to drill the two rod holes, but opted for a 1-3/8" forstner for the acme thread. Hole size isn't critical here - it's just a place for the rods to pass through, so oversizing a bit won't do any harm. (Better to go over a little than under a little, definitely!) For mounting under the 3" benchtop I used seven #14 2-1/2" pan head screws; for the 2-1/4" thick chop I used 3 #14 1-1/2" oval head screws. Adjust accordingly for the specifics of your bench and in a couple hours you'll be done. And should you opt to upgrade to a fancier face vise in the future, this one can come out leaving nothing but seven little holes hidden out of view on the bottom of your workbench top. 1 Year Update: Still liking this vise, but finally tackled the vertical racking problem with an inelegant yet completely satisfactory solution. As originally installed, the vise tended to "pinch" the bottom of work pieces, leaving a gap at the top of the chop. So I loosened the screws and inserted some scrap copier paper, folded over to make about an 1/8" shim, in the back between the mounting bracket and the bottom of the bench, then tightened her back up. Viola! Now when the vise is tightened, the top of the chop engages first. With additional tightening the vise's natural racking action brings the bottom of the chop squarely against the side of the bench. As for the horizontal racking, that still gets shimmed based on the work piece. But hey - one out of two fixed.
Scritto da: Eugene Kasper
Nice low cost vice
I am a beginning woodworker. I built a workbench, American Woodworker Dream Workbench, and needed a vice. This vice looks exactly like others under various brand names with higher prices. Like some of the others, the lack of instructions threw me at first but the picture on the box is all that is needed. The lack of a hole template is also a non-issue as the back support is removable making a perfect template. To make a template, I traced the back on a scrap piece of 1/4 inch luan. I drilled 7/8 inch holes for the two support rods and a 1 1/4 inch hole for the screw rod. Those dimensions are then easily transfered to the vice faces. I am using a 2x6 fir that I ran through the joiner for the face front jaw but plan on replacing it with a full 2 inch thick and 5 1/2 inch wide maple 18 inch long for the front jaw face. I added a 1 by 4 six feet long maple as the back face so the back jaw is flush with the workbench face. This helps supporting long boards. The lack of a handle is easily fixed - I am using one from another vice but am planning on having friends turn a new oak handle using the lathes at my woodworking club in Green Valley, AZ. I might try turning a mesquite handle - now that would be cool. I have not added the bench dog to the jaw face wood but will try that in the near future. This vice works well and I am pleased as the price is good and so is the quality. I will probably purchase a second one for a tail vice. If I can make this vice work then so can anyone. This vice is a great buy and, like always, Amazon shipped promptly and with Amazon Prime, no shipping charges.
Scritto da: Howard Beller
I used the rear portion of the vise as a template. Just unscrew it.
I took it apart and used the rear portion as a template. It is an end vise and I used 2x10s for the front and rear faces and Clamped them together when I drilled the holes so they matched. The2x10 part that attaches to the bench is as wide as my bench. I made the fit to the bench top a little higher and planed it down. You will need a spacer to attach below the bench to get the correct Height. **It did need some adjustments for the round supports which I placed behind the Rear face. Aligning these helped the racking. As other posts indicated, racking is normal especially if the face is long. Use a Wedge on the opposite side of the work (or bottom) to help eliminate the racking. I found an old vintage Wilton (9-63) for the face vise. . *** Both of these were challenging to install. Look for example pictures for help. For the handle. I used a not too loose fitting dowel (I think 1 inch or less) and made end caps using a forstner bit first for a shallow inside hole, then followed with a hole saw for the outside. Made of contrasting wood. I put rubber O-Rings between the the dowel and the cap to soften the banging and eliminate any pinching by a sliding handle.
Scritto da: Chad 3325
you can get pretty close by taking off the inner guides and using ...
I would buy this again, but I'd pay another $5 if it came with a 1c paper template giving you the exact distance of the inner jaw holes. In truth, you can get pretty close by taking off the inner guides and using those as a template, but there is no plane where the 3 holes are in proper alignment for where you need to drill. Seriously, it will waste at least half, more likely one and half hours of your life because a 1c paper template is too much to ask. That said, once you get it assembled, jaws made and holes drilled, this is a big, solid piece of equipment with great acme screws. What else do you want me to say? Solid, well build, will last for a long time. Did I mention how annoying the lack of a one cent paper template was?
Scritto da: Kindle Customer
Home made template - easy to do
As other reviewers have indicated, this is a fine bench vise for the money. Some reviewers have bemoaned the lack of a template, so I was ready for some fiddly fitting. But, I racked all three rods to be even at the rear, flipped the vise on it's "back," and put a 1/4 plywood piece against the three rod ends and traced their outlines. Since the bench top and plywood were simulating the underside of the mounting configuration, this tracing was what I needed to drill the holes. Please note that the template I've attached shows the exact size of the rods -- but like others have suggested, I drilled them considerably oversize (1": and 1- 1/4"). It's interesting that the three rods do not line up horizontally at all. I hope you can read the marking pen numbers on the photo.
Scritto da: D.M. Wilknott, West Hill, On
Going Old School
The Shop Fox D4026 Cabinet Maker's Vise is based on an old English Irwin-Record wood worker’s vise that was discontinued back in the early 80’s, as is the green painted H7788 Cabinet Maker's Vise by Grizzly Industrial which lists for $101.09, and of course the other T24249 Cabinet Maker's Front Vise from Grizzly is the same as their H7788 save for the added hardwood jaw, and hardwood dowel handle, and black paint job and it lists for $199.74. Make no mistake all three of these vises are most likely manufactured in the same off-shore factory, by the same company, and I’d say more than not, somewhere in China or there-a-bouts. But the Shop Fox D4026 has some added savings for me, and to me that is value I can spend on minor improvements that will get me farther ahead of the same $200.00 vise from Grizzly. Are each and every vise that come from this factory, that are made for Shop Fox going to be perfect, not by a long shot, are some going to be better than others, yes. I know this because I bought 2 of them, and as another reviewer already stated, he had to fiddle with his and make a few modifications. I knew this going in, and at $88.00 dollars Canadian, I got good solid value for my dollars. Am I running a Veritas style workshop where .030 thousands of an inch is going to affect my work, not likely. But then again I’d never mount plywood to a cabinet maker’s vise to start with anyway, even if it is laminated. So to hear someone gripe about the Shop Fox D4026 being off by .030 thousands of inch, as if it mattered because the vise was apt to experience inelastic distortion – well don’t use plywood is all I’ll say to that. If not, I suggest he pony up the $265.00 or so Canadian dollars and buy the English made Irwin-Record wood vise. The way I’m looking at it I’m saving $177.00 Canadian dollars over the English Irwin-Record wood worker’s vise, and with those kinds of savings I can spend another $30.00 Canadian on materials to improve the Shop Fox, and some sweat equity. But by the time I’m done, I’ve got a $265.00 vise that only cost me $88.00 for the vise plus the $30.00 in material to upgrade it. That’s only $118.00 for my vise, and I have 2 of them. That’s a savings of $294.00, so pardon me if I recommend the $88.00 Shop Fox D4026 vise, and give it 4.5 star rating for good measure.
Scritto da: StealthSingh
Works perfectly
I genuinely decided to write this review because I found some of the reviews seem disingenuous or at least I don't agree with them. I wanted a vise similar to this one, and this one was at least the most I wanted to spend at the moment. Granted the vise came in a box, with no instructions etc. and it was solely upto me figure out. My thought process was, if you want to use the vise, then you should know how to install it. The vise guide rods were loose so when taken apart, obviously they had some sway in them, unlike one of the poster commenting on quality control. The only way it would be considered quality control would be if they when tightened together, they are not aligned. Anyhow, I decided as part of my installation, I would take some pictures so as to make it easy for anyone else that wants to install it. My steps can be summarised as: 1. Trace the holes, lines for reference 2. Drill on test piece of wood. 3. Make adjustments, and test drill again. 4. Now drill the actual wood that I am planning to use for vise grips/? 5. Install the vise There were two things I had to also account for. I wanted to use 2x6x20 wood pieces. My table is about 2.25 thick. Instead of regular wood working tables with solid legs etc. I had test built two kitchen base cabinets and ended up using the as my base. So effectively my vise would be screwed in approx 2.75 inches from top. Long story short, I add piece of plyboard etc so that I would have 4 inch from guide rods to top of my vise. I had found and old piece of 2x10 that I was planning to use in the back of my shed, it had some worm etcs but structurally looked ok. As I was cleaning it and resizing it, I cut it so I had approx 2 inch from top of guide rod to the bottom. As I didn't have spare wood, I decided to really pay attention to traced template, and eventually decided to just draw it in LibreCAD. This actually helped out immensely, because even when I had perfected the test holes with tighter tolerances, I decided to increase the hole sizes to account for installation, use etc. The best part was because the baseline(bottom of table) was part of my drawing I was able to to print out my drawing and paste on both faces to ensure I had everything correct. Once the holes were drilled, I was done installing the vise in no time. P.S. I tried adding the DXF/PDF but was unable to upload for my review. So I have included the png of my template.
Scritto da: Happy Wanderer
Sloppier than a dockside hooker when the ships are in
All vises of this type suffer from racking and this one is no exception, so just understand what you are getting into. There are no mounting instructions, so expect a certain amount of guesswork, trial and error and swearing before you get in installed. The best advice I can give you is don't do what I did and install the vice with my bench top in-situ. It's a nightmare. Best to unscrew your benchtop, flip it over and install the vice that way. Everything is just easier with the benchtop flipped. It took me a day and a half to get it installed, although this is not the vices fault, any vice would take this long as I had to laminate the jaws and I was working upside down, which is a nightmare. This is a well-made vice, and value for money. Just understand first what you are buying and do your research. You may find yourself preferring a different style of vice.
Scritto da: Stray Feathers Press (Consignment)
Poor quality control a disappointment
In both the first vise, and a replacement sent promptly by Amazon, the guide rods were more than 1/8" out of parallel, and would not fit into the base casting without being sprung apart. The castings for the outer jaws were not flat. Some castings were rough, and I had to file a lot of burr away in order to get the handle I bought to fit. Oddly, there are no instructions whatsoever to install the vise, and no installation hardware. I did receive prompt and courteous service from a Shop Fox tech, but in the end, two bad units in a row was too many, and I bought a very similar vise, including instructions and a hardware kit, made in the Czech Republic (the faulty ones are made in China), elsewhere. Amazon accepted my return without question.
Scritto da: Steve G
Works, but no instructions.
This seems to be a fine vice, but without any instructions, template, handle or hardware it makes it a not great product. Would it kill them to throw in a 10 cent piece of paper with some instructions and a template? Constructing your own handle is not easy either. Spend a few more bucks and get one with some extras.

Prodotti correlati

hot
Morsa combinata Yost Vises 455
3.8/5

€ 239.83

Morsa combinata Yost Vises 455
3.8/5

€ 239.83

hot
Morsa combinata Yost Vises 465
3.8/5

€ 305.53

Morsa combinata Yost Vises 465
3.8/5

€ 305.53

hot

Scopri il nostro network internazionale

Spediamo in 28 paesi, oltre 200.000 prodotti. Resta aggiornato, iscriviti alla newsletter.

Shopping Cart