AprilAire 700M Umidificatore per tutta la casa, Umidificatore a fornace alimentato a ventola manuale, Umidificatore per tutta la casa di grande capacità per case fino a 5.300 mq. Ft, Bianco

Brand:Aprilaire

3.7/5

670.36

DESCRIZIONE DEL PRODOTTO AprilAire ha introdotto il primo umidificatore evaporativo per i sistemi di forni ad aria forzata nel 1954. Da quel momento, AprilAire continua a guidare il settore dei sistemi di umidificazione domestica. I nostri umidificatori evaporativi funzionano convogliando l'acqua nel vassoio di distribuzione situato nella parte superiore dell'umidificatore. L'acqua viene distribuita uniformemente su tutta la larghezza del vassoio e attraverso un sistema di uscite progettato scientificamente. Scorre per gravità sull'evaporatore del pannello ad acqua. L'aria secca e calda proveniente dal sistema HVAC viene spostata attraverso l'evaporatore del pannello ad acqua carico di umidità. Avviene l'evaporazione naturale, l'acqua si trasforma in vapore e l'aria umidificata viene fatta circolare in tutta la casa. INCLUSO NELLA CONFEZIONE: Istruzioni di installazione e modello, umidificatore con ventola incorporata, trasformatore da 24 VAC, controllo manuale dell'umidificatore con sensore, valvola a sella, elettrovalvola e pannello dell'acqua modello n. Lo smorzatore di bypass è opportunamente etichettato sia per le impostazioni estive che invernali, consentendo di impostarlo per l'intera stagione senza congetture. L'umidificatore per tutta la casa Aprilaire Model 700 è semplicemente l'umidificatore bypass con le migliori prestazioni sul mercato.

UMIDITÀ PER LA SALUTE Gli umidificatori AprilAire possono aiutarti a mantenere un'umidità ottimale nella tua casa del 40% - 60%, che ha dimostrato di ridurre l'incidenza di infezioni respiratorie e sintomi correlati ad allergie e asma riducendo al minimo la formazione di batteri e virus, funghi e acari della polvere. Inoltre, ti sentirai più a tuo agio preservando anche gli oggetti della tua casa suscettibili ai danni causati dal cambiamento di umidità o dalle condizioni di siccità. IL VENTILATORE INCORPORATO estrae l'aria riscaldata direttamente dal forno attraverso l'umidificatore. UMIDIFICATORE MANUALE con un singolo sensore integrato nel controllo standard monitora l'umidità relativa interna per l'uso nell'impostazione manuale della percentuale di umidità nella tua casa. COPERTURA COMPLETA fino a 5.300 piedi quadrati in case ben costruite con una capacità di 18 galloni al giorno. ACQUISTA CON FIDUCIA Questo umidificatore è stato progettato e prodotto negli Stati Uniti da AprilAire, l'inventore dell'umidificatore evaporativo per tutta la casa e leader nelle soluzioni per la qualità dell'aria interna.
Brand Aprilaire
Capacity 18 G/day
Color Gray
Country of Origin China
Domestic Shipping Item can be shipped within U.S.
Filter Type Evaporative
International Shipping This item can be shipped to select countries outside of the U.S.
Is Discontinued By Manufacturer No
Item model number 700MZ
Manufacturer Research Products Corporation
Product Dimensions 10.34 x 15.91 x 18 inches; 17 Pounds
Special Feature Adjustable Humidity Control, Auto Shut Off, Humidistat

3.7

10 Review
5 Star
77
4 Star
14
3 Star
4
2 Star
2
1 Star
4

Scrivi la tua recensione

La tua mail non sarà pubblicata. Tutti i campi obbligatori sono segnati con*

Scritto da: leoisright
these should be manditory on all furnace installs. love this unit!
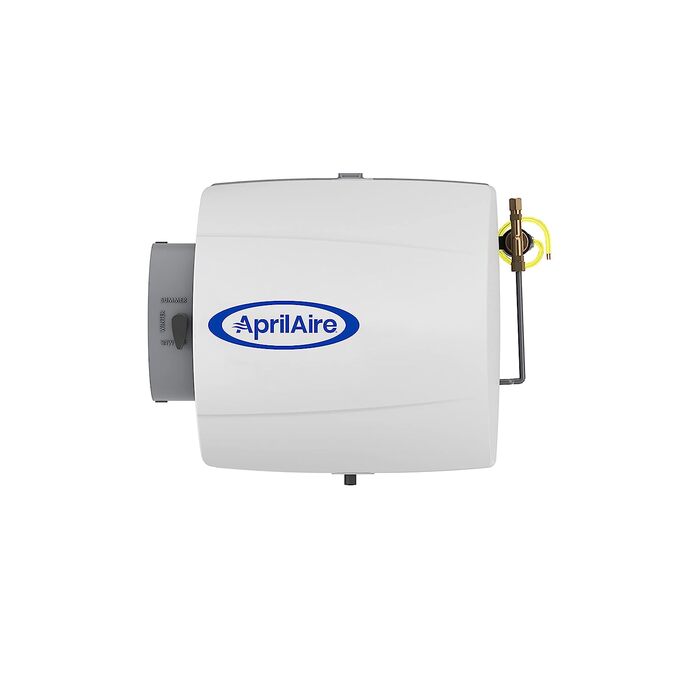
OK, this is exact same as the automatic except it has the manual humidistat. I was a bit nervous about installing this because of how little room to install this. There is literally 1/2" between the wall and this now. But works amazing! Straight forward installation. Installed on the supply plenum. One thing, don't use the saddlevalve they give you. Go buy a sharkbite valve. Super easy to install with no soldering required. List of supplies used. 1. Metal tape (duct tape for the plenum but made of metal) 2. Tin snipe. (To cut the plenum) 3. 3/4" sheet metal drill bit (titanium or better) 4. Sharkbite valve (connect to water line. Just push pipe in both sides((1/2" osd)) 5. Sharkbite 1/2" to 1/4" on/off valve 6. 1/4" osd foggy plastic hose (connects to the water inlet on humidifier) 7. 1/2" clear tube (for the drainage tube on humidifier to drai ) 8. 18x2 thermostat wire, wire nuts, and plastic tube to hide wires. 9. 1/2" copper tube. Maybe need only 3"-5" (extends the sharkbite valve) 10. 20' outdoor extension drop cord (only if you don't have plug near supply plenum) 11. Level 12. Electric drill 13. Yellow handle tin snips (yellow means cuts strait lines or curved) 14. #8 self tapping sheet metal screws. 1", and only 4-6 is needed. 15. Pipe cutter 16. 13mm open socket wrench Shut off breaker to furnace. Do not install before you do this. So, the toughest part on the install was cutting the plenum. I didn't have enough room for the drill to drill hole, but was creative and got one made. The instructions are the template for the humidifier base. Used a level and made sure it was on level. I chose to use the supply plenum to install so I wouldn't need to use hot water. Save a few gallons of water daily. After the square hole was cut, I used a hammer and pliers to make sure the edges were even. Then mounted the base, and screwed it in. Next, used the metal duct tape (do not use regular tape, must be the metal kind) to tape around the base. Take your time and make it look good. Next, wiring. The bottom of the base has two brown wires. Using the 18x2 thermostat wires, connect one brown wire to the common circuit on the furnace circuit. Should be labeled C. Next, connect the other wire to the W (24v aux). Connect that wire to one terminal on the humidistat. First mount the humidistat where you want it. After the the power wire is connected to the humidistat, add another wire to the other post in the humidistat. Doesn't matter which one you use. Take that wire and connect it to the other brown wire on the base of the humidifier. Next is the water. If you have a water softener, you will be using the copper line going from there to the water heater. Shut off the main valve and grab a small bucket (water will drain from the line) and place under where you want to install the sharkbite adaptor. Use a black marker and mark the pipe. Then measure 1" both left and right. This is where you want to make your cut. Cut the pipe in both spots so you have a 2" space between ends. Slide the sharkbite adaptor in between and press the adaptor hard in each side. It will lock in to place. Cut a 3"-5" piece of spare copper pipe and push in the middle of the adaptor. Then attach the 1/2" to 1/4" sharkbite valve. Push it hard and it snaps in. Take off the 1/4" but and the copper coupling inside. Slide the foggy 1/4" tube through the but and then the coupling and in to the valve. Using a #13 wrench, tighten the but down as much as you can without breaking it. Connect the other side of the tube to the bottom of the humidifier base. Using the same method of through the but and coupling, then tighten down a lot. Otherwise this will leak. Next connect the 1/2" drain line. Run it from the bottom of the humidifier base to your drain near the water heater or softener. If there isn't one, you will need to buy a pump and attach it to there and pump it out of the house or to a drain. Last, use the extension cord, connect from outlet to plug on the humidifier. Use the black tube to conseal the wires if you want. Turn on the water to make sure no leaks. If there are some at the valve and base of humidifier, tighten those nuts down. It will stop leaking. May seem like you will break the sylanoid on the base, but it won't. Turn on the furnace breaker, set the heat to high to you can monitor the humidifier. It should be working fine. Alternative install. Use the transformer and connect to the HUM spot on the circuit board and the other to Neutral, the the humidistat to one of the back side and other goes direct to the brown wire on the base of humidifier. I am not a HVAC tech. So if you have questions I can't really help. But installing yourself will take 3-5 hours depending on trips to the hardware store. It will also save you between $350-$500. The total cost of the parts were right around $100. But because I didn't have the drill bit, the pipe cutter, yellow tin snips, metal tape, extension cord, or tubing. If you have those, the sharkbite adaptors will be around $25. So far we have felt an immediate impact on the air quality. Well worth the price.
Scritto da: Soso
Awesome humidifier. No need to make two holes in the duct system
The difference between this model and the other ones is that you don't need to make a 2nd hole in the return duct system. This one only need one hole for the humidifier. It's a cleaner install and very simple. I bought the manual version, so I don't have to worry about the outdoor sensor. Then I figured out how to hook it to Ecobee thermostat. Now the thermostat control the humidifier which is awesome. I have an older house. If temperature drops below freezing, you see ice on windows if windows are leaking air. Ecobee control humidifier (frost control) in colder day so it doesn't put a lot of humidity. I installed it myself. The hardest part was making the hole in the duct system. Electric saw makes it much easier.
Scritto da: Amazon Customer
You may also need to order a Model 50 Current Sensing Relay...
This is the 5th 700M whole house humidifier I have installed. You need a set of straight, right and left cut tin snips to cut the opening for the humidifier and the humidistat - especially if you're in an area that is a tight squeeze. If you have a furnace that doesn't have a terminal for a humidifier on its main board, you'll also need to order a Aprilaire Model 50 Current Sensing Relay from Amazon so that the humidifier only goes on when the furnace fan is running.
Scritto da: Rocky
Best model on the Market
Don’t mess around with the cheap models that rely on your supply and return air to work. This produces more whole house humidity than any other model.
Scritto da: John Kennedy
Aprilaire 700M installation and tips.
The Aprilaire arrived quickly within 3 days. When I was quoted $350.00 for a HVAC contractor to install the humidifier system, I decided to undertake the installation task. Installation is straight forward and the instructions are very easy to follow; but it does take a moderate understanding of electronics and a bit of plumbing know-how. The hardest tasks were cutting the opening for the humidifier on the furnace duct (my space was very cramped which highlighted the difficulties of cutting sheet metal), and running the connector wire from the humidistat to the humidifier through the crawlspace under the house. The instructions themselves on the reverse side were the template for cutting the opening. You must have a level to ensure a level opening or else the humidifier will not work efficiently. Once the duct opening was cut and trimmed, then the humidifier frame was attached. You need to make certain to slide the mounting frame topside clips first under the duct sheet metal and lift the unit to secure the bottom clips over the bottom of the opening. Then turn the two metal clips on either side of the humidifier to 90 degrees and tighten to the duct. (I used my better half's compact mirror to check the all of the clips on the backside) 6 sheet metal screws finished the attachment. The humidifier was then hung onto the mounting frame easily and just clipped into place. Once the humidifier was attached, I shut off the furnace electric feed at the fuse panel. I hooked up the electrical connections first from the provided 24 volt AC transformer to the humidistat, humidifier and then Aprilaire sensing relay (not included in the humidifier package) to the common (white) wire on the furnace blower. This would turn on the humidifier when ever the blower was on even when heat might not be needed. To hook the plumbing into the humidifier you have to install the provided saddle valve to the hot water pipe leaving the hot water heater; then connect the humidifier selinoid to the saddle valve with 1/4 inch O.D. copper tubing (not included in the humidifier package). The last thing I attached was a 1/2 inch I.D clear vinyl tubing that was routed to the A/C condensation drain pump. After I was certain everything was connected satisfactorily, I turned on the furnace breaker and opened the saddle valve. The initial setting on the humidifier was turned to max and then I could see water trickling down the drain tube confirming the system was operational. My observations: 1. Within the first two hours operation home humidity went from 26%R.H. to 37%. 2. Static electricity shocks (very annoying) went to zero in a couple of hours. 3. No nighttime bloody noses of kids. 4. Dry skin seems to be healing (6 days so far) Two things that stand out that were not included in the package were the 24 volt sensing relay and 1/4" OD copper tubing. While these are minor issues, I did have to make a trip to the local hardware store to get the tubing and wait another day for the sensing relay. Overall, I have been very satisfied with the performance of the Aprilaire Humidifier 700M. One month after installation, I am still a very happy customer. House feels warmer now-thermostat is set 2-3 degrees lower than it was set before humidifier installation. I will check my heating gas bill this year vs last year to determine cost savings. Recommended Tools/Supplies for installation: Needle nose pliers Wire stripper/cutter Tin Snips Level 1/4" copper tubing 5ft for my purposes**not included in package 5ft ID vinyl drain tubing**not included in package Sensing relay**not included in package, but probably not necessary for units with an outside sensor included. Electrical tape Nov. 2016 Update**** Humidifier working without skipping a beat. I change the water pad every year just before turning on the furnace. Humidistat setting is normally 35-40%. I can honestly say this unit saves us between 8-12 percent in heating costs. Picture shows how tight installation space is on our furnace-but doable. Darn picture keeps loading sideways-sorry
Scritto da: Amazon Customer
Great product and works great!
Product arrived. Installed it in 4 hrs next day. It brought the humidity up in our 2200 sq ft home in approximately 4hrs. I would recommend this product.
Scritto da: ggenin
Extra bit of Humidity Makes a big Difference in Comfort
Works much better than the Generalaire bypass-type humidifier that was in place. Raised humidity level from 30 to 45%. Install was straight forward. A couple of minor issues: 1.) piercing saddle valve provided is not the way to go for the water supply. 2.) Drain hose is 1/2" diameter while most furnace ans A/C drains are 5/8".
Scritto da: Brian
difficult to install for a DIY 700m with Manual Control but doable
hole saw to start your hole and tin snips needed to cut into your duct work. Difficult to cut with tin snips but doable. hardest part is wiring the unit because the instructions are incredibly vague. The transformer gets mounted to a nearby electric outlet connecting the black and white wires to hot and neutral. However transformer is OPTIONAL if you have another way to source 24v. You can instead source your power from your furnace which is PREFERRED. This should be your FIRST option as this allows your humidifier to power off when your furnace is off saving you water. Connect one 18/2 gauge wire (not included) to your Furnace common the other end to your manual thermostat, any one of the two connector and the other thermostat connector to your humidifier yellow/brown line (doesnt matter which of the two). Then connect the second 18/2 guage wire to your furnace's HUM 24v connector to the second humidifier yellow/brown line. This allows your humidifier to only turn on when heat is activated. To TEST turn up your humidifier thermostat, make sure your humidifier is plugged into an outlet and turn on your furnace heat. Should hear the fan from the humidifier turn on when the furnace is activated. Essentially as long as the humidifier sees complete circuit to both yellow/brown lines it gets activated. if you want full control and want to be able to run the humidifier from a smart thermostat such as nest, you can technically connect directy to your smart thermostat without extra gear. Essentially you would remove your connection to HUM and connect directly to your thermostat such as the * connector on NEST. Remove the manual thermostat and connect the other yellow/brown line directly to common on furnace. This gives nest control instead of your manual thermostat. Do this on a weekend because it will take you all day. Prep your equipment ahead of time. Does not come with everything. You need 18/2 wire, drain hose, copper line from hardware store as stated in instructions
Scritto da: Roger Foster
Over Priced
these like many are way over priced for what they are, unfortunately I could not install this due to space between the furnace room wall & the clearance needed to swing up & remove the cover, this is a beast & not well supported, it has no metal mounting bracket for support, it merely hooks over the cut out hole in the duct work & has flimsy locking tabs to hold it in place (a lot of weight with this fan in the cover model) so in the end I returned it & found the General Aire brand a direct replacement of the old one so it was a simple install & the pad is replaced through a top or bottom access cover unlike the AprilAire that requires you to unhook & swing up the cover from the bottom then lift it off (probably not an issue for most installations)
Scritto da: raymond3080
Controlled with ecobee works great
No more dry air. Hooked it up with hot water. Wired to the ecobee and it's working great. No more bone dry air.

Prodotti correlati

Scopri il nostro network internazionale

Spediamo in 28 paesi, oltre 200.000 prodotti. Resta aggiornato, iscriviti alla newsletter.

Shopping Cart