Toddleroo by North States 47.85" Wide Easy Swing & Lock Baby Gate - Serie 2: chiusura di sicurezza extra sicurezza. Montaggio hardware. Adatto per aperture 28.68" - 47.85" Wide (31" di altezza, bronzo opaco)

Brand:Toddleroo By North States

3.5/5

153.72

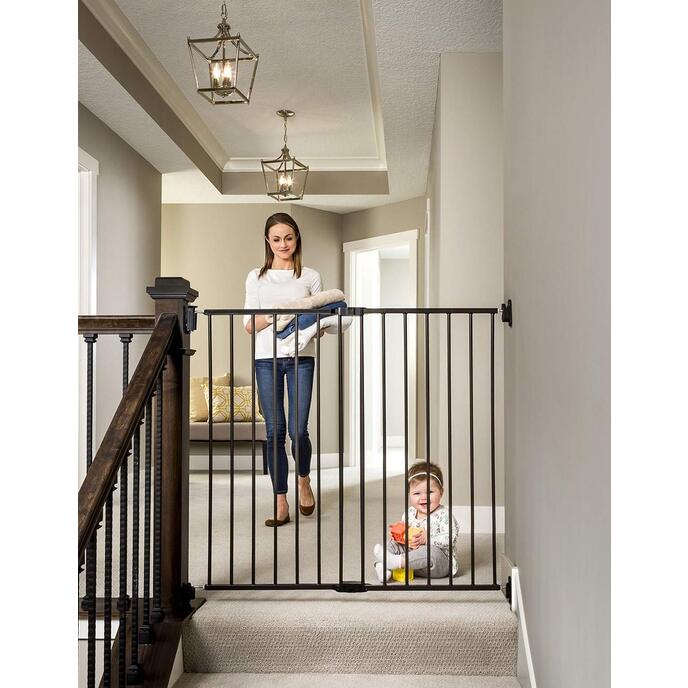
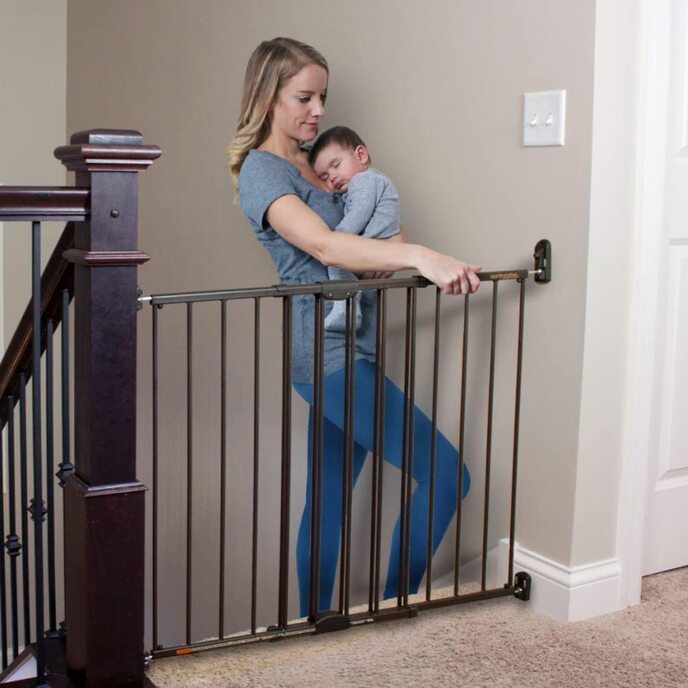
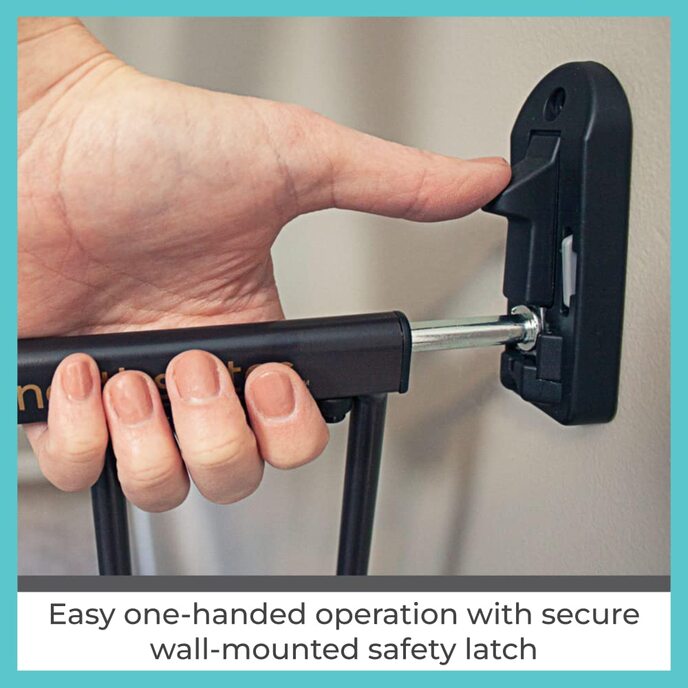
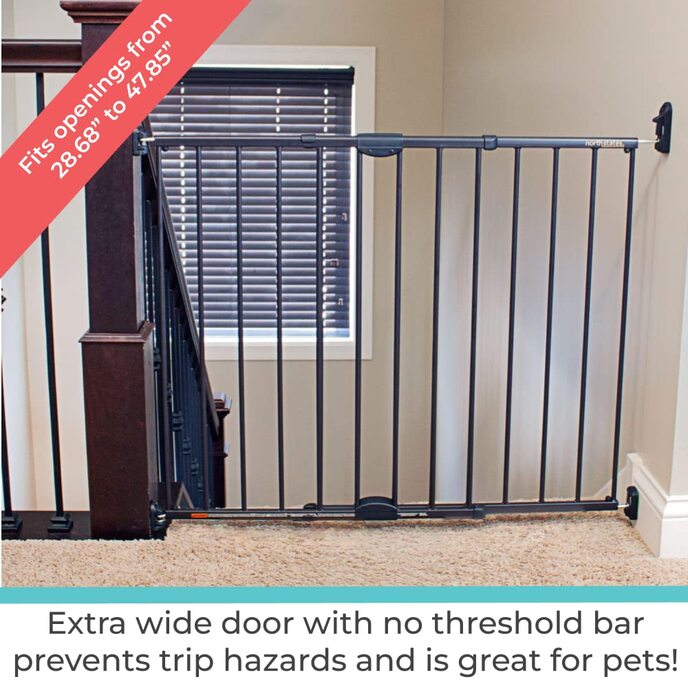
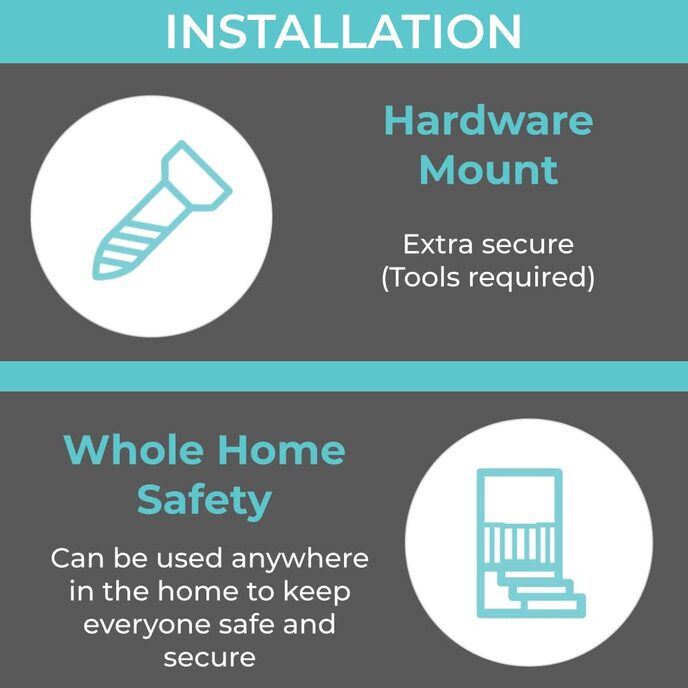
Assicurati che il tuo piccolo sia al sicuro e protetto con Toddleroo by North States Easy Swing & Lock Gate Series 2. È il cancello perfetto per l'hardware da utilizzare in cima alle scale, nei corridoi o nelle porte. La robusta struttura in metallo in acciaio e la finitura decorativa in bronzo opaco completeranno qualsiasi arredamento della casa, mentre la sua solida struttura realizzata con materiali di altissima qualità è progettata per resistere a un uso rigoroso. Amerai la facilità semplice dell'operazione con una sola mano e la sicurezza extra del design del fermo di sicurezza. Per aprire il cancello, basta premere il pulsante di chiusura superiore con il pollice e sollevare il perno del fermo dalla tazza, quindi spingere o tirare il cancello per aprirlo. Quando si utilizza in cima alle scale, non lasciare mai che il cancello oscilli sopra le scale. Quando non in uso, sposta semplicemente il cancello in modo che non sia d'intralcio. Perfetto per quando hai ospiti. Per rimuovere e riporre il cancelletto, premi il pulsante sul coperchio del cardine e solleva il cancelletto. Ideale per una varietà di aperture della stanza che misurano da 28,68" a 47,85" di larghezza ed è alta 31". Ogni cancello Toddleroo by North States è certificato JPMA e ASTM.

EAN: 0026107050502

Categories: Sicurezza, Cancelli,

REGOLABILE PER UNA VARIETÀ DI SPAZI: questo cancello è alto 31 pollici e progettato per adattarsi alle aperture della stanza da 28,68 pollici a 47,85 pollici di larghezza. Le barre sono distanti 2 3/4. Questo cancello è certificato JPMA. Sicuro per bambini dai 6 ai 24 mesi. CARICATO CON CARATTERISTICHE CONVENIENTI: Dotato di funzionamento con una sola mano. Per aprire il cancello, basta premere il pulsante di chiusura superiore con il pollice e sollevare il perno del fermo dalla tazza, quindi spingere o tirare il cancello per aprirlo. ELEGANTE E AFFIDABILE: la finitura in bronzo opaco e la struttura in acciaio resistente rendono questo cancello resistente e facile da usare. Il design semplice ed elegante completerà qualsiasi arredamento domestico. SICURO E SICURO: mantieni i tuoi cari al sicuro con questo cancello montato su hardware che include la sicurezza extra del design del fermo di sicurezza. NOTA: questo prodotto deve essere installato come montaggio hardware (richiede fori di perforazione). TENERE I PIÙ PICCOLI AL SICURO DAL 1953: sicurezza senza preoccupazioni! Il cancelletto per bambini Easy Swing & Lock è costruito in metallo resistente, durevole e resistente ai bambini con barre verticali difficili da scalare, mantenendo il tuo bambino al sicuro.
Batteries required ‎No
Brand Toddleroo By North States
Color Matte Bronze
Country/Region of origin ‎China
Customer Reviews 4.4 4.4 out of 5 stars 13,722 ratings 4.4 out of 5 stars
Item model number ‎5050
Item Weight ‎9.83 pounds
Material Alloy Steel
Material Type ‎Alloy Steel
material_composition ‎Metal
Mounting Type Hardware Mount
Number Of Items ‎1
Package Dimensions ‎30 x 27.25 x 2.25 inches
Safety warning ‎Check the included instruction manual for a complete list of safety warnings. You will also find the PDF of the manual on the Amazon listing.
Style ‎Series 2
Target Species Dog

3.5

7 Review
5 Star
70
4 Star
16
3 Star
7
2 Star
3
1 Star
4

Scrivi la tua recensione

La tua mail non sarà pubblicata. Tutti i campi obbligatori sono segnati con*

Scritto da: Greenapple
Strong and smooth
The media could not be loaded. We have had these gates (one for the bottom of the stairs on for the top) for the past 4 months and love them. The gate is built strong and looks great. Our son, who is 2 and is very strong cannot get these open no matter how hard he tries. We call him a linebacker and he's solid muscle, in 90th percentile in height/weight. Once ripped open a child locked drawer in our kitchen because he wanted a spoon for his yogurt. You wouldn't believe how strong this kid is, so that's saying something. One side is mounted on a pivot that is screwed into the wall while the other side slides into a latch which is screwed into the wall. The latch has a built in stop to prevent the gate from swinging further past the latch. The gate can be pushed relatively gently to the latch and it will lock with an audible click. The latch has a thumb lever that presses down while you lift the gate with your curled fingers to release the gate from the latch. Our very small 6 year old needs 2 of her tiny hands to open this gate. Our 8 year old daughter has no problems opening the gate. It takes a bit to get used to but for us, we're happy the way it operates. You'll have to figure out which side to designate as a pivot side and which side is for the latch as well as which direction the gate will swing. Our gates obviously swing away from the stairs both top and bottom. Now, before getting into the installation, you have to assess if this product is for you. It's important to know that not all staircases are made the same. Our staircase is closed, meaning both sides of the stairs from top to bottom have drywall on each side. Even so, the spots where we mounted the gates may not have had studs behind the drywall so we needed to place plastic anchors for sturdiness. YOU CANNOT INSTALL ANY PART OF THIS ON DRYWALL ALONE, they'll rip right out of the wall if a kid rattles the gate while it's closed or if you are walking by with laundry blocking your view and not realizing it was left open then walk into it pushing it passed it's pivot point. Also, if you have wooden/metal railing on the bottom of your staircase instead of wall you'll need to construct a slab of wood or metal in the railing so the hardware can be mounted properly. Now the installation. I threw out the template they gave. These steps are easier to follow and will give a smooth close: 1) Take the 2 pivots which are made of 2 halves and slide the halves apart. The top part of each pivot is the piece with the silver metal sticking out. Put aside the top half for the last steps. Install the bottom part of the bottom pivot into the wall with a screw and mount the bottom corner of the gate onto it. 2) While supporting the gate with one hand, slide the bottom half of the top pivot into the top corner of the gate then hold it against the wall. It would help to have a second person hold the gate but it can be done yourself with difficulty. 3) While supporting the top pivot and gate in place, check that the gate is plumb with a leveler. After angling the gate into plumb level, mark the top pivot holes. 4) Take the gate off the bottom pivot and install the top pivot into the wall. 5) Remount the gate on both pivots then unscrew the top/bottom handle pieces and remove them. Put aside along with their screws. 6) Note the adjustable screws on each corner of the gate. Screw the screws on the latch side into the gate as much as they can. You may need to unscrew the washer all the way to allow the screw to tighten all the way. 7) Slide the gate open so these screws end up touching the wall where the latch will be located. BOTH screws should be touching the bare wall EQUALLY. THIS STEP IS CRUCIAL IF YOU WANT THE GATE TO LATCH SMOOTHLY. If they are not both touching the wall then lengthen/shorten the screws on the latch side so that they both touch on the wall equally. You should NOT have the only the top touching the wall and the bottom one hanging in the air or visa versa. 8) CHECK WITH A LEVELER THAT THE GATE IS LEVEL. Meaning, that it is perfectly parallel to the floor. If needed, adjust the screws on the pivot side to obtain a perfect level. If any adjustments are made on the pivot side, you need to readjust the latch side as described in the previous step. 9) Once the gate is level and both top/bottom screws are touching the latch wall equally, replace the top/bottom black handles back on the middle of the rails of the gate and use their screws to fasten them to the top/bottom rails. If needed, you can slide the gate closed a little to fit the handles in between the gate slats. Not to worry about the latch side screws, you can extend them out so that they will reach the wall after you slide the gate closed to fit the handles since they're really long. (You may not like the look of the screws sticking out a lot on the latch side, so if you want then you can extend the pivot side screws to "shift" the gate towards the latch side but keep in mind you'll have to readjust the screws on the latch side again so they end up equally touching the bare wall. ALWAYS CHECK THE GATE IS LEVEL TO THE FLOOR AFTER ANY ADJUSTMENTS ON THE PIVOT SIDE.) 10) Slide the top latch into the top screw of the gate and adjust the screw in or out as necessary; it shoulld not be tight against the latch like it's pressing the latch into the wall. It should be sunk into it gently. It's OK if it wiggles a bit, as long as it's sunk in and latches the gate into place. MAKE SURE THE LATCH IS FACING THE CORRECT DIRECTION. 11) Mark the holes in the latch. 12) Open the gate and install the top latch into the wall. Close the gate into the latch and ensure the stopper is facing the right direction. 13) Install the bottom latch in the same manner as the top one. This one has more wiggle room than the top. 14) Slide the top parts onto the pivots and screw them in. Tighten the nuts on all corners of the gate. (I used a drop of super glue on the side of each nut then screwed them in place.) You're done!
Scritto da: SonnyandSam
Excellent Child or Pet Gate
I purchased two North States 47.85" Easy Swing & Lock Baby Gates. Both are being used as pet gates but could also end up being used as baby/toddler gates for the grandchildren when they visit. These were relatively easy to install. It will help to have some DIY experience. You will need at least a drill and Phillips screwdriver. A 2 foot level will help to make sure the hinges and latches are plumb (vertically aligned). The directions are easy to follow and it comes with a template to tape to the wall so you can drill your holes in the correct locations. All required hardware was included. You just need a few tools and some common sense. I mounted one gate in a doorway that had no molding and another hallway that did have 3/4 inch wide moldings. Yes, you can mount this if you have floor moldings. And yes, it does fit the width specified in the description. My one door opening was 47 1/4 inch wide. Please ignore the comments that say otherwise. Either these people are too incompetent to install such an easy gate or are just lying to post a bad rating. For the record, I did read the directions but I did not follow them or use the templates. So these really are not difficult to install. I mounted a lower hinge first and then hung the gate with the end propped on a small drill box I had for balance. I then placed the second upper hinge with the top gate hinge attached and marked my drill holes using one of the wood screws attached. I then removed the gate and drilled a hole where the mark was. FOR SAFETY OF YOUR CHILD AND PET, YOU MUST DRILL INTO AND SCREW INTO SOLID WOOD; NOT JUST DRYWALL! In my one doorway, I have 1/2 inch drywall but behind that are 2x4 studs. I chose to replace the 1.5 inch wood screws with 2.5 inch drywall screws to get more depth into solid wood. I chose drywall screws because they had a similar color to the bronze screws to match the gate color. Oh, by the way, the bronze is a lot closer to black than bronze. But they look great. I like the look much more than white. Kind of classy looking. They are very well built also, Very sturdy when installed correctly. Again ignore the comments from people who clearly have no clue how to install something this simple to install. Some people just need to hire a handyman or professional. Don't risk your child or pet's life if you have no clue what you are doing. And don't leave dumb reviews that are inaccurate. Anyway, back to the installation tips. Once the hinges are installed, I moved to the upper latch. Like with the hinges, I placed the upper latch in position connected to the metal stud that screws into the gate horizontally. Find the correct position and mark the two holes with a screw or awl. Then drill your holes and screw the screws into the latch. Do the same for the lower latch and you are done. Installation in my hallway was a little trickier for several reasons. Because of a bathroom door, I need to install the second gate in the middle of our hallway. I had to find a verticle stud using a stud finder so that the gate hinges were installed into solid wood. Again I used 2.5 inch drywall screws. You may be able to find bronze or black wood screws online. The big orange box and blue box stores did not have any in stock. Drywall screws are a little more brittle than wood screws but should be fine in this installation. Be careful not to strip the screw head off the shank if you use an electric/battery drill to drive your screws. Of course on the opposite side of the wall, there is no stud in the right location. So I chose to use nylon EZ Ancor (not a type) Drywall Anchors. These are a step up from your typical plastic anchors that people use to hang pictures. ...not a good choice in this type of installation. I am hoping my dog will not force the gate in any way. If she does, I will have to install a wood batten strip attached to two studs to support the latches. So far, so good. She is not trying to jump on the gates at all. She does tend to jump on people. Hey, it's a new rescue dog; I have to train her. :-) The gate is entirely metal. The hinges and latches are made of a high grade plastic material. The plastic hinges will wear fine. As others have noted, I also have some concern with the latches. They should last for a while. It is important to make sure both latches are vertically aligned so that both grasp the horizontal metal studs at the top and bottom of the gate when you close the gate. You will need to close the gate firmly with a good swing to get them to close and lock properly. IF you try to pull the gate closed gently, they likely will not engage completely. I like that we can swing the gates in either direction. I also found the spring inside two of the latches were quite firm and would not let the stud engage the latch completely. But after swinging the gate closed several times forcibly, the latches engaged every time reliably. But you should always check for safety reasons that they are fully engaged. IF YOU ARE INSTALLING THIS GATE OR ANY GATE AT THE TOP OF STAIRS, PLEASE INSTALL THE STAIR GUARD SO THAT THE GATE DOES NOT OPEN OVER THE STAIRS. AGAIN, THAT IS TO PREVENT YOUR TODDLER FROM INADVERTENTLY OPENING THE GATE AND TUMBLING DOWN THE STAIRS. A gate is not a replacement for parental supervision. After using these gates for several days, my wife and I are very pleased with the function and looks of these gates. We have also had several guests who have noted how they look so nice and how easy they are to open and close. I think you will be very happy if you purchase this gate. My only complaint, I wish the company had a taller version for the 47 inch wide opening. These are about 29 inches tall and add a couple inches based on where I attached the hinges and latches. Remember if you have a baby or toddler, be careful not to leave too much space at the bottom for the child to slide under or get stuck under the gate.
Scritto da: mrs kim bosley
Ok
Ok
Scritto da: Laureen López
Muy buena puerta
Es una puerta resistente, fácil de manipular con una mano, con cierre automático, pero que no contempla la existencia de los zoclos, por lo que no puede quedar al ras del piso. Afortunadamente ni mi bebé ni mi perrito chihuahueño caben por debajo. El espacio entre las rejas tampoco permite el paso de los perritos. Para instalarla se necesita un taladro, los tornillos vienen incluidos pero son muy cortos, nosotros optamos por ponerle unos más grandes para más seguridad. Y además de todo, es muy bonita.
Scritto da: Angiephilia
Súper útil y práctica
Es un poco complicado instalar, aunque trae plantillas pero se adaptó Justo para lo que quería , lo uso para mis perros y va en las escaleras , así que no quería que al abrir la reja quedara algún barrote cruzado en el piso , cómo sucede con los otros canceles que cheque por aquí . La calidad es muy buena , incluso piensan que me la instalo un herrero hecha a medida El sistema de cierre es muy práctico
Scritto da: Mauricio
No es funcional a su máxima apertura.
Es correcto que el máximo es 1.21... Sin embargo y lamentablemente al tener la máxima apertura los accesorios (topes) que trae para fijar el correr de las rejas ya no es funcional debido a que sólo embona entre el espacio de los barrotes (8cm aprox) y cuando esta en su máxima apertura ya no caben los accesorios (topes) entre el espacio que queda y por lo tanto las rejas quedan flojas. En la publicación deberían de especificar que la apertura MÁXIMA y FUNCIONAL es de 1.12 cm haciendo uso de los accesorios (topes) para fijar el correr de ambaa rejas. Pongo dos estrellas ya que perdí tiempo presentar, reempaquetar debido a que las especificacionea no cumplen para que sea FUNCIONAL. La resistencia es buena.
Scritto da: Isaac
Excelente en todo pero le faltan accesorios para instalación en muros que no son de madera
Excelente producto en cuanto a funcionabilidad y durabilidad, mi niño intenta escalarla y no se vence, incluso se ve muy bien estéticamente. El único detalle es que no tiene los tornillos, la broca ni los taquetes necesarios para instalarlos en concreto, sólo viene con pijas para madera por lo que tendrás que comprarlos y necesitarás un taladro con rotomartillo

Prodotti correlati

Scopri il nostro network internazionale

Spediamo in 28 paesi, oltre 200.000 prodotti. Resta aggiornato, iscriviti alla newsletter.

Shopping Cart