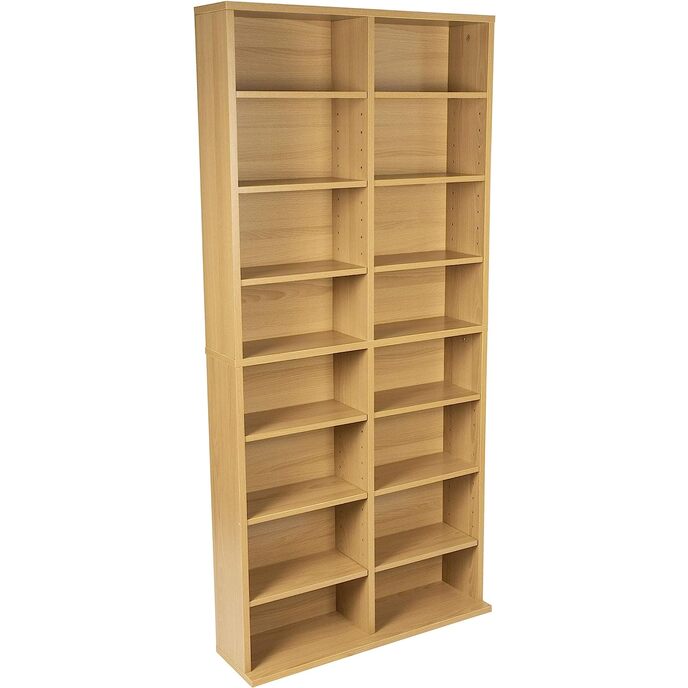
I have read most of the questions and comment on this product and I can certainly understand theMm as I have bought and assembled over 30 of these units and the similar single unit for my home theater DVD/Blu-Ray library. I probably have more than average experience in assembling this type of furniture due to my previous work. Hopefully my comments can be of help to prospective buyers. First, I am more than happy with the presentation of my disc library in my home theater. Every visitor comments on the library before they comment on my art deco interior or my extensive electronics. I do think that it turned out well. I primarily used the 38435720 Oskar 464 Media Wall Unit to line both sides of my theater. Assembly: The trick to assembling these units is to not get in a hurry in the beginning and do it right. If you make a mistake early on, you will work yourself to death trying to force something to make it right. Second, read the instructions. Sounds easy, but most of us know that we don't do it. Third, You have to open your box completely, and lay out all your parts in correct stacks according to part number or letter. Get yourself a shoe box or cake pan for all of the hardware so you have it all ready to use and you know where it is and you don't loose any of it. Then get rid of all the packing. I read all of the problems that people were having with assembly, and most of it was because they did not get the first shelves assembled SQUARE. Everything on these units must be square or none of the holes will line up. Until you are VERY sure of what you are doing, make sure that you use a carpenter's square to attach the sides to the shelves in a square manner. Always keep the unit square as you are working. (hint: if you do not have a square, you can check the rack or square of your shelf by measuring the diagonal top to bottom of each side. then move it until each side of the diagonal is exactly the same. then it is perfectly square) I found that using a little carpenter's glue in the wood pegs made the shelf at least 50% more sturdy. The unit gets most of its strength from its back. That is what keeps the unit square, that is what is going to make the shelves fit, and that is what is going to allow you to attach shelves together if you want to have more than one shelf for your movie library. Although the manufacturer recommends that you nail the back on with the small brads that they provide, I found that they have a tendency to pull out of the particle board. Since the back is so important to the integrity of these shelves, I chose to lay the shelving on its face and lay the backing in place, and if you have done your job properly, the shelf should be square. I check the square, then put two small SCREWS in each back board to keep them in place. I then drill additional screw holes in all of the boards using the back boards as a template. I finish up by filling each of these holes with the small screws. You would not believe how sturdy your shelf is now, just by using screws on the back board, making it square, and using glue on the wooden dowels. You have at least doubled the value of your piece of furniture. Note: You would think that the double Media Wall Unit and the Single Media Wall Unit would be compatible. If you look at the measurements they look like you could set them beside each other and they would fit. They come from the same manufacturer, They are the same finish. Well, kind of, but not really. First the base or foot extends much further on the single unit than on the double. Second, the height is about 1/8 to 1/4 inch different. You can adjust that on the bottom so it is not so noticeable. Third, the shelves are a little different in thickness and in length. I would recommend following the manufacturer's instructions on attaching the shelving to the wall. I would also try to find a stud if at all possible and use one of the screws provided to screw directly into the stud so it is attached at a height somewhere close to the top of the shelf. I used 3/4 inch drywall screws to attach my shelving together. I drilled two small holes directly through two shelving holes I was not using at the top of my unit and straight through to the next unit. I matched the units up and screwed them together. I repeated the procedure at the bottom of the unit. 4 screws are sufficient to attach each unit. With all of the units that I have had, I have never had to return ANY units or ANY parts. I read about the people getting bad cams and breaking them, I learned early on to put my cams in when I lay out my boards and align the arrows. It is NOT tight, it is getting the arrow aligned. I did get one opened box which was obvious freight damage. There was no damage to the wood, (these things are packed well) but there were a few hardware pieces missing. I called the manufacturer and they helped me immediately and courteously and I had my parts within a couple of days. As far as the lamination, the oldest ones that I have are over a year old and they still look new. I can't tell you which ones are the newest and which ones are the oldest. None show any wear. I am getting ready to buy another 3 to house my cd's and Karoke collection.