Kit valvola di scarico Kohler 04-2302, 04-2302

Brand:Kohler

3.4/5

93.29

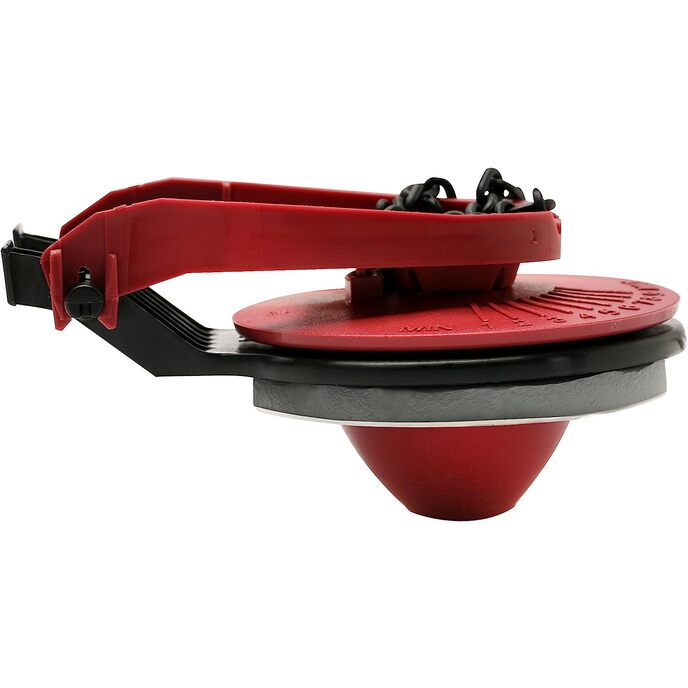
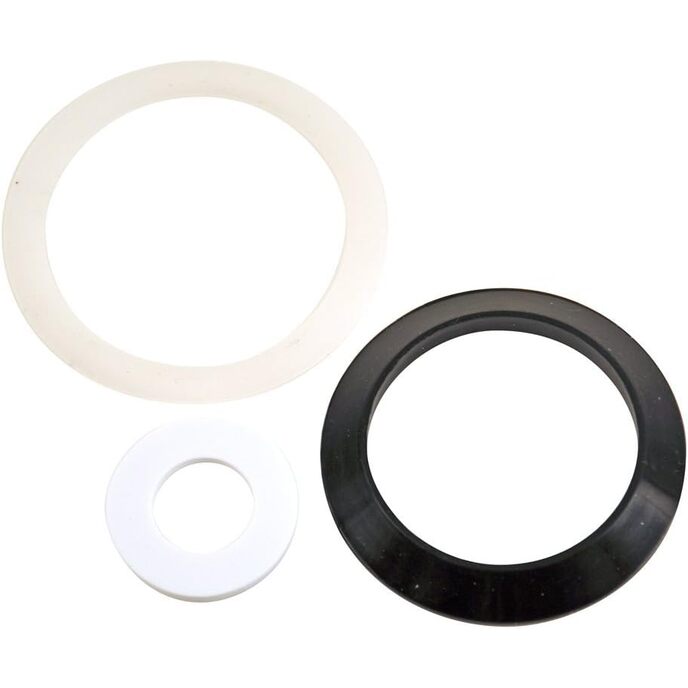
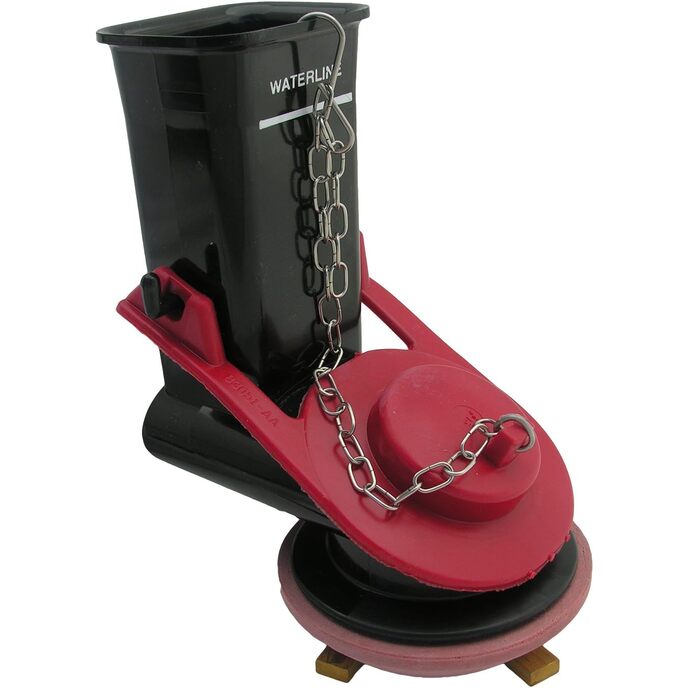
DESCRIZIONE DEL PRODOTTO Proteggi la garanzia sui prodotti Kohler, cerca sempre il logo Kohler GENUINE Parts. I ricambi originali Kohler sono progettati dagli ingegneri Kohler per mantenere le prestazioni originali del prodotto e promuovere la longevità del prodotto. DAL PRODUTTORE Kit valvola di scarico Kohler 83650 con 9,8 per 4,8 per 4,3 pollici che si adatta ai servizi igienici più bassi di un pezzo.

Pezzi di ricambio Kohler. Si adatta alla maggior parte dei WC bassi monoblocco. Un kit di risciacquo sostitutivo. Realizzato con materiali di prima qualità per una maggiore durata. Progettato per promuovere la longevità del prodotto. Si adatta alla maggior parte dei WC bassi monoblocco. Parte ORIGINALE Kohler.
Batteries Included? ‎No
Batteries Required? ‎No
Color ‎Kohler 04-2302
Country of Origin ‎USA
Customer Reviews 4.3 4.3 out of 5 stars 76 ratings 4.3 out of 5 stars
Item model number ‎04-2302
Item Package Quantity ‎1
Item Weight ‎8.8 ounces
Manufacturer ‎KOHLER
Part Number ‎04-2302
Product Dimensions ‎15 x 8 x 2.5 inches
Warranty Description ‎One-Year Limited Warranty

3.4

7 Review
5 Star
66
4 Star
13
3 Star
13
2 Star
4
1 Star
5

Scrivi la tua recensione

La tua mail non sarà pubblicata. Tutti i campi obbligatori sono segnati con*

Scritto da: easyup
Fits but don't care for the chain
Kohler should know that if the chain has a large hook for the lever the chain can get caught in it and cause a leak.
Scritto da: EM
Works with older, Realta one piece toilets (triangle shaped ...
Oh you want to feel (Wo)Manly? Put down that 20v drill and install one of these bad boys. You will need the following to do this job. This product, big grey add on gasket, phillips screwdriver, a low profile bucket, a single edge razor blade scraper, a clamp light or flashlight, 2 tall adult beverages, skinny hands (if you can’t get them in a Pringles can you’ll have issues), and a large vocabulary of four letter words. Go ahead and wait until the kids are at school, take the day off work and meditate before starting. First you’ll have to shut off the water supply and drain the tank. Remove the flapper and twist the old valve off, next remove old foam seal (this will discolor your skin and I now look like the hulk). After removing the seal you’ll notice some siliconed to the tank, here is where the razor blade comes in. (Also why I recommend the larger gasket) Once cleaned and free of the crap the last guy put there to stop the water leak, open the new flush valve. Remove the red foam seal, install the grayish one, and notice how the three brass tabs are installed. Start... Have a drink. This is where the fun begins. If you will stick your fingers in the hole and feel around you’ll notice how the tabs have to swivel two of them will only go one direction. Take your Phillips screwdriver and listen the adjustment screws until two threads are remaining in the brass tab. This is important and I know you won’t listen but you’ll soon learn why. Press the new valve over the hole and while applying pressure turn the brass tabs with your skinny fingers until they are under the porcelain. This is where you didn’t listen and the tabs won’t go under, you try to loosen them and they fall into the hole. Start cursing, remove valve, stick your skinny fingers into the hole and grab the tab you dropped. If this disappears you’ll likely find it in the bowl. Go back to start. Once tabs are all holding, check to make sure the gasket is covering the whole hole and slowly tighten the tabs to squish the gasket. You’ll need to hold the tabs in place while turning the screw or you’ll be starting over. No need to get them overly tight, you can break plastic and then you have to wait another 2 days for a new valve. Good job! Have a drink. Install the flapper and connect the chain to the handle, turn on the water and check for leaks. If there aren’t any you are done and are a real (Wo)Man now! Works with older, Realta one piece toilets (triangle shaped mounting hole) but takes some finesse. If the top flange/gasket were a bit bigger and the screws about 1/4" longer it would make it easier.
Scritto da: Jim S
Works, but requires patience due to careless engineering
If you have a certain type of one-piece Koehler toilet and need to replace the flapper assembly (like me) , then this works. It isn’t easy to install but anyone can do it with some time and patience. As with most Koehler products, it’s a Rube Goldberg solution - needlessly complex, cumbersome, and prone to future failure. It relies on a rubber seal and 3 small clamps that must be installed in a space that’s difficult to get to, see, or work in. Expect one or two of the clamps to fall into the lower inaccessible area during installation, and make sure you have a grabber tool nearby (they’re brass so a magnet won’t work). This happens because the bolts have to be just barely engaged to allow the clamps to swing under the virtuous hole, and the clamps unscrew easily. Koehler could improve this device in a number of ways that wouldn’t increase their costs: make the brass bolts 1/8” longer, or make the bolt-to-clamp threading slightly tighter so they don’t swing freely. This would also fix another problem, which is that it’s difficult to rotate the clamps to a secure position under the vitreous hole; they will swing out of position unless the assembly is completely level which is impossible during installation. Adding to installation frustration is the difficulty centering the device over the hole. You can’t see the position of the device relative to the opening, so you have to sort of use your finger as a gage around the inside of the hole to try to tell if it’s equal all around. That’s not easy even if you could get your finger all the way around it, which you can’t. Again this would be incredibly easy for Koehler to fix by simply making a slight change in the shape of the rubber gasket. This is a basic DIY job: turn off the toilet water valve, flush the water out of the tank, unscrew the 3 clamps and remove the old assembly, and reinstall this new one careful to work around the absurd engineering shortfalls.
Scritto da: The Schrock
It worked on my one piece
I read several reviews on how hard this part was to install. I spent more time adjusting the chain/float than I did installing this part. The trick is to put in the screws and brass pieces in advance of dropping in the toilet. Once in, you have to push down on the large lower part of the piece and use a finger to turn the brass piece under the ceramic lip. Once you do it to all 3 then tighten them. Put on the flapper and other parts and make adjustments. The part itself took me 5-7 minutes to get in. I hate the design, but it worked.
Scritto da: Theo
Will be a pain if you don't get other stuff
Decided to follow what other reviews where saying and got the following in addition: -12 inch long phillip screwdriver -Kohler GP83888 Gasket -#10-24 X 1-1/2" screws It does make the whole thing easier. The screws are difficult to reach so the 12 inch will help you there. The larger gasket and screws will make it easier to tighten the tabs without them accidentally falling off the end of the screws (good luck getting them back after that). You'll see what I mean when you actually do it. I would swivel the tabs till there is about 3-4 threads visible on the end of the screw. Then stick it in the hole and hold the tabs while you screw them in with your 12 inch screwdriver. Whole thing took about 20 minuets. By the way I have a Kohler Rialto K-3402-PB-NA Hope this helps
Scritto da: steven siladi
Flush valve
Liked They are genuine original
Scritto da: laurier st
Solution
Fini le problème de koehler

Prodotti correlati

hot
Parte di ricambio Kohler 1004808
3.4/5

€ 64.51

Parte di ricambio Kohler 1004808
3.4/5

€ 64.51

Scopri il nostro network internazionale

Spediamo in 28 paesi, oltre 200.000 prodotti. Resta aggiornato, iscriviti alla newsletter.

Shopping Cart