CURT 31180 Attacco ricevitore anteriore da 2 pollici, selezionare Toyota Sequoia, Tundra

Brand:CURT

3.1/5

478.29

INSTALLAZIONE FACILE. Questo gancio di traino anteriore è progettato con un design specifico per il veicolo per adattarsi a modelli selezionati di Toyota Sequoia e Tundra. RESISTENTE ALLA CORROSIONE. Per una protezione superiore contro ruggine, scheggiature e danni causati dai raggi UV, questo gancio anteriore è ricoperto da un doppio strato di rivestimento antiruggine A che ricopre il gancio all'interno e all'esterno e da un rivestimento in polvere nera altamente resistente. COSTRUZIONE TESTATA. Questo attacco a montaggio anteriore è stato completamente testato per la tua sicurezza presso la nostra struttura di ingegneria di Detroit. Testiamo i nostri modelli di gancio di traino anteriore secondo le specifiche SAE J684. FORZA AFFIDABILE. Questo attacco anteriore è valutato per 5.000 libbre. GTW e 500 libbre. peso della lingua. È anche valutato per 9.000 libbre. capacità di trazione in linea retta per traino di recupero e applicazioni con verricello (limitata al componente di traino di livello inferiore). RICEVITORE VERSATILE. Aggiungi un utile ricevitore di traino all'estremità anteriore del tuo veicolo con questo gancio di traino per montaggio anteriore. Il ricevitore standard da 2 pollici consente di collegare uno spazzaneve, un portapacchi, un portabici, un gancio di traino, un supporto per verricello o altri accessori di traino.

Prodotto non disponibile
INSTALLAZIONE FACILE. Questo gancio di traino anteriore è progettato con un design specifico per il veicolo per adattarsi a modelli selezionati di Toyota Sequoia e Tundra. RESISTENTE ALLA CORROSIONE. Per una protezione superiore contro ruggine, scheggiature e danni causati dai raggi UV, questo gancio anteriore è ricoperto da un doppio strato di rivestimento antiruggine A che ricopre il gancio all'interno e all'esterno e da un rivestimento in polvere nera altamente resistente. COSTRUZIONE TESTATA. Questo attacco a montaggio anteriore è stato completamente testato per la tua sicurezza presso la nostra struttura di ingegneria di Detroit. Testiamo i nostri modelli di gancio di traino anteriore secondo le specifiche SAE J684. FORZA AFFIDABILE. Questo attacco anteriore è valutato per 5.000 libbre. GTW e 500 libbre. peso della lingua. È anche valutato per 9.000 libbre. capacità di trazione in linea retta per traino di recupero e applicazioni con verricello (limitata al componente di traino di livello inferiore). RICEVITORE VERSATILE. Aggiungi un utile ricevitore di traino all'estremità anteriore del tuo veicolo con questo gancio di traino per montaggio anteriore. Il ricevitore standard da 2 pollici consente di collegare uno spazzaneve, un portapacchi, un portabici, un gancio di traino, un supporto per verricello o altri accessori di traino.
Brand CURT
Brand ‎CURT
Country of Origin ‎USA
Customer Reviews 4.0 4.0 out of 5 stars 83 ratings 4.0 out of 5 stars
Exterior ‎Black Powder Coat
Finish Type GLOSS BLACK POWDER COAT
Is Discontinued By Manufacturer ‎No
Item model number ‎31180
Item Weight 30 Pounds
Item Weight ‎30 pounds
Manufacturer ‎Curt Manufacturing
Manufacturer Part Number ‎31180
Material Carbon Steel
Model ‎Front Mount Hitch
OEM Part Number ‎31180
Product Dimensions ‎20 x 42 x 10 inches
Vehicle Service Type Marine-Personal-Craft, Van, Sport-Utility-Vehicles, Truck, Trailer

3.1

4 Review
5 Star
54
4 Star
24
3 Star
4
2 Star
4
1 Star
14

Scrivi la tua recensione

La tua mail non sarà pubblicata. Tutti i campi obbligatori sono segnati con*

Scritto da: Robert
TAKES SOME BENDING AND MUSCLE TO INSTALL
I bought this for my 2006 Toyota Sequoia. I was disappointed to find that the holes for the screws only lined up on one side, and the other side was inches off from being lined up. I did some research before attempting to return it, and found someone else who used a bottle jack and a piece of wood to bend his open wider to make the holes line up. Although it was not fun, I tried it and it worked… Also there is no need to drill into your frame to mount the 5th snd 6th screws, I travel to California and back all the time with Heavy motorcycles on the front of my truck and it has been holding up strong for almost a year now. You can check the video that I made on the install on @Robnzackgarage on YT. I tried to give a good break down of the solution. Good Luck!
Scritto da: Wesley Everett
Curt hitch with cheesy install method or Reese/Draw-Tite?
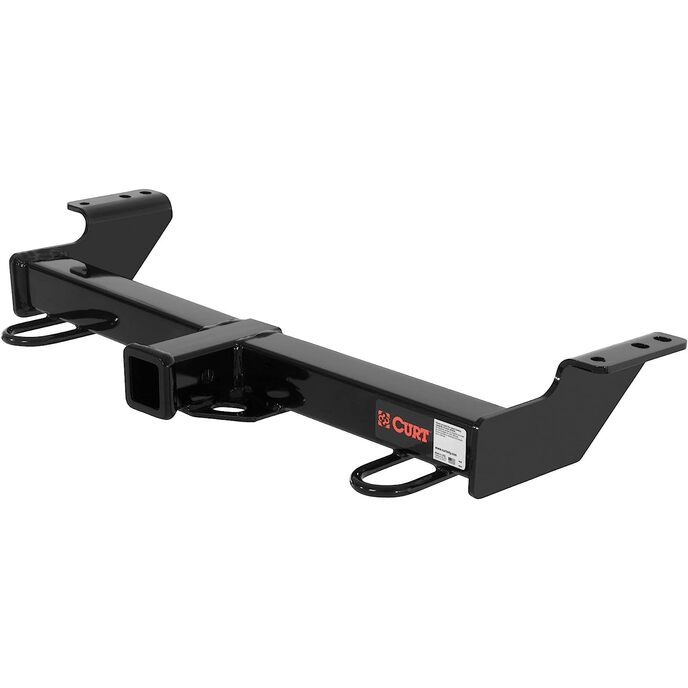
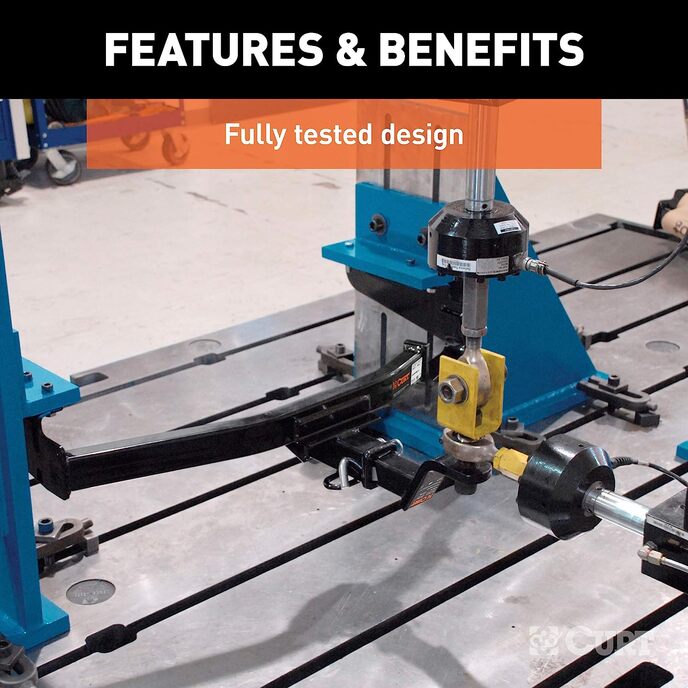
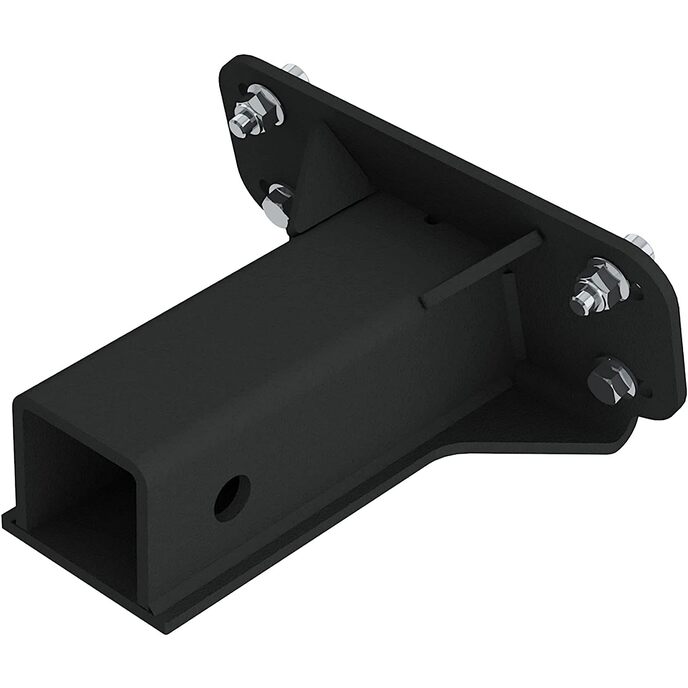
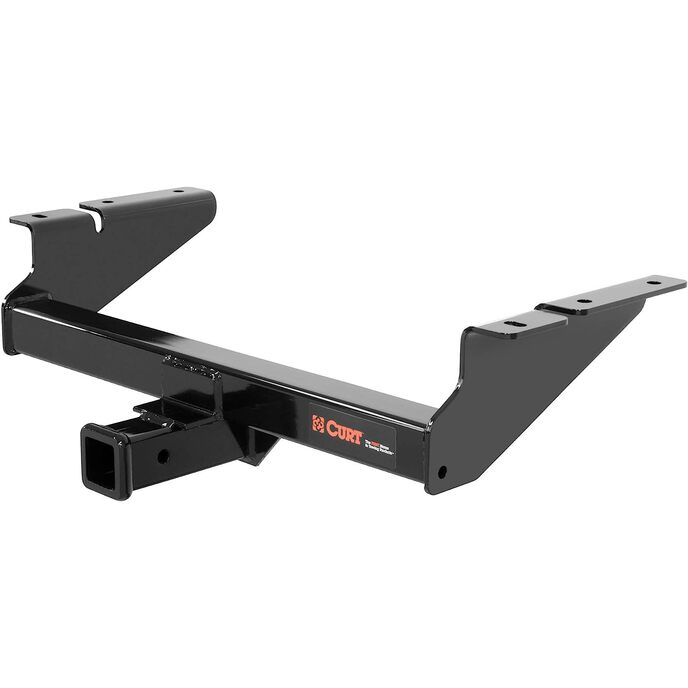
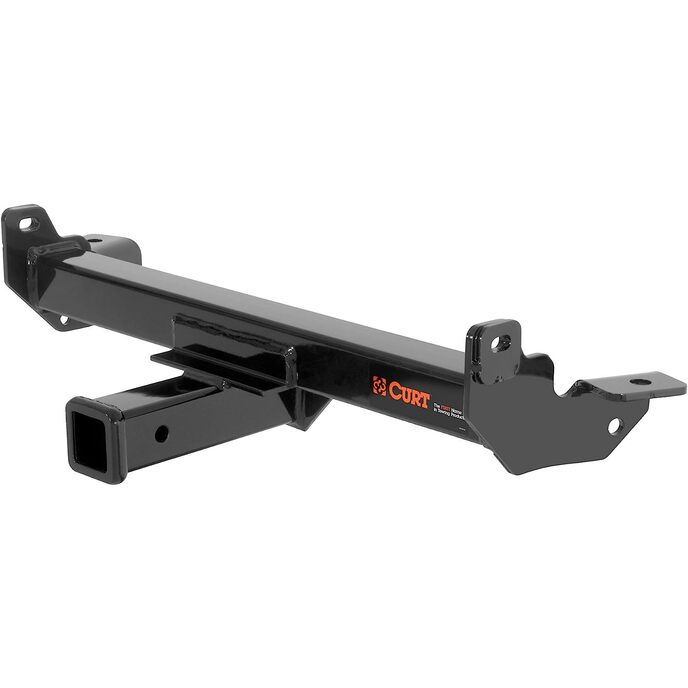
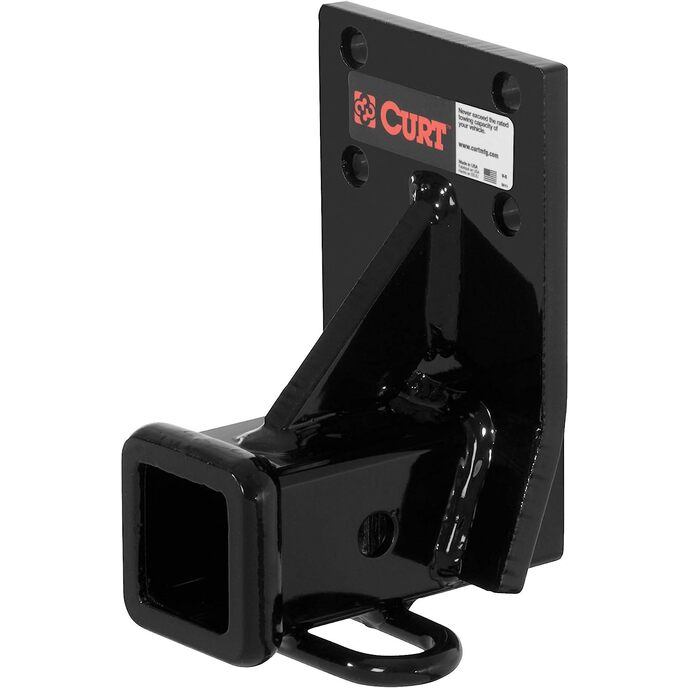
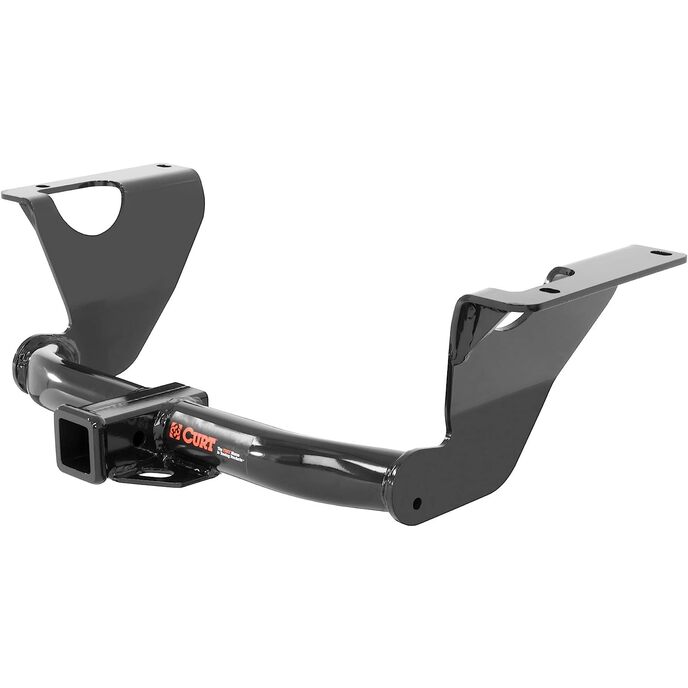
Perhaps some poor soul out there with a Tundra can learn from my (unfortunately) extensive experience with two front hitches widely available for the Tundra: A Reese/Draw-Tite hitch, with a logical install method, but mounting holes that would not fit my vehicle; or this Curt hitch, which did fit, but had a mounting scheme apparently devised by bored chimpanzees. For starters, I strongly disagree with other review that calls this Curt hitch "super easy" to install. In fact, it can be a nightmare. I'm fairly handy mechanically, but the Curt method to add a third mounting bolt to strengthen this hitch (beyond the two existing bolt holes for tow hooks on '04-gen Tundras) is sort of a joke. Curt provides a flexible "fishwire" to drop a large bolt and mounting flange down into an existing access hole in the frame, about 10 inches to the rear of your newly drilled hole (the third hole) all the way up near the front of the hitch. You're supposed to pull the wire down through your newly drilled hole, fish the hardware forward, and the bolt, you hope and pray, will drop down through the hole, allowing you to nut it off, tighten down and be finished. In my case the fishwire broke off in my hand as I delicately tried to thread the bolt down through the new hole, leaving me with both bolt and mounting flange bouncing around inside the frame -- and no clear way to retrieve them. I was able, after three hours (literally) of effort, to use what remained of the fishwire to miraculously push the mounting nut flange up to the front of the frame and get it to drop out of a narrow opening there. And then I eventually got the bolt to the same position and in true McGyver fashion, managed to work it back along the frame rail and down through the mounting hole by employing some monofilament fish line reverse threaded through the hole via the supplied fishwire. Countless profane adjectives were uttered, but the bolt is now in place, albeit without the inside lock flange that's supposed to hold the carriage bolt in place for tightening. It did tighten enough regardless that it should stay put, and at least it's not loose, rattling around in there. Bottom line: It's a pretty stupid design. If you lose the hardware inside the frame, your only other recourse, I believe, would have been to remove the entire front bumper and access it through the open front end of the frame. This experience left me too traumatized to even attempt (so far) to put the third mounting bolt in on the other side. (For my very lightweight intended use, it's probably not necessary anyway). Plus, I have no intact fishwire to do so, and will have to seek a replacement from Curt. Something to consider: The comparable Reese/Draw-Tite hitch for this vehicle model is heavier, larger, slightly more expensive, and has a much more logical mounting system. That hitch sits much farther back on the frame of the vehicle. The third mounting hole in this design is directly below the large insertion opening in the frame. Draw-tite's third hole is to be drilled here, and the mounting bolt is inserted from the outside, to a nut that has a flexible metal handle for insertion down through the frame opening. You just bend the handle in the proper shape to get the nut straight down and onto the bolt. YOu never actually let loose of the nut handle until the bolt is threaded on. And you could use the handle, which stays attached and sticks through the opening to retrieve the nut later if you want to take the hitch off permanently. IMO it's an infinitely superior design, both for install purposes, and for overall hitch strenth, as it spaces your bolts out across a much larger space on the frame. I bought this hitch first, and unfortunately never got to this third bolt install, because the entire hitch was a touch too wide to fit the existing front mounting holes on my Tundra (for whatever reason; see my review of that product). I had to return it, receiving not an ounce of help or even sympathy from their parent company in the process. Amazon, however, was fantastic about the return, picking up the shipping on a very heavy item, which is why I shop here in the first place. If you're willing to take the chance on fit, the Draw-Tite Reese hitch is a better design. If you DO decide to install the Curt hitch, some advice: Make sure the third hole you drill in each side of the frame is VERY well rounded out by the bit, to ensure the bolt will fall through without requiring even a slight amount of tugging on the fishwire. Remember: The bolt will be a touch thicker than its original size (and the drill hole size) because of the fishwire wrapped around its threads. If I were to do this again, I also would loop some monofilament line or something around the head of the bolt and leave that hanging out of the insertion hole, just as a backup in case the fishwire broke again. That way you could at least retrieve the hardware and start over if things went bad. Of course, if you're only using your front hitch for a bike rack or rod holder or pushing around a very light trailer, you probably don't need three bolts in each side in the first place. I note that the same Curt hitch for newer-model Tundras (starting '07, I think) only uses two bolts, and they're not that much more spaced out along the frame than these are. Finally: The form/powder-coat finish of the Curt hitch is nicer than the Reese/Draw-Tite, as well. And it's almost 10 lbs lighter, if that matters to you one way or the other. Bottom line: For pushing around a very heavy trailer, I would want the Reese/Draw-Tite hitch, assuming it fit my rig (maybe mine really is the only one on the planet with mounting holes set 1/8 inch too far apart), because it would install without insanity, and looks beefier all around. For lighter apps, I would go with the Curt and just use two bolts on each side.
Scritto da: WRP
Actually, EASY install
I received the hitch a few days ago and finally got up the courage to install it last night. I've installed a few hitches on a few different vehicles in the past & they are, generally, bolt-n-go type assemblies. This one requires a little more... The item arrived in a nice, oversized cardboard box secure inside by two wads of foam. The instructions & hardware were securely taped to the receiver opening on the hitch. The instructions are a simple, 1-page deal with only a handful of easy to understand steps. The only step that was slightly unclear was the one pertaining to cutting the plastic skid plate/pan but more on that to come. Hitch is well built & fairly hefty in weight. The hardware was of proper size & all parts needed were included; including the pill wire but more on that to come. The instructions are also available to download but here's a brief overview of what I did & what I can remember of the install: Remove the existing tow hooks under the front of the truck; 2 bolts each & they were firmly secured in there. Cut opening in slid pan/plate. I didn't clearly understand what part, or actually what direction, I was supposed to enlarge the plastic pan opening based on the directions since there were no pictures/images/illustrations so I took a little extra time to prop the hitch up to see. It appears to only affect the two (small) plastic pans; one on left/right & not the main skid pan. I removed both of those; 2 bolts & 2 screws each. The plastic is soft & cut with relative ease using a sharp box cutter & tin snips. I personally opened it up about 1" towards the front of the truck & about 1" towards the motor side of the opening. Nut sure what purpose those two smaller pans serve (to the left/right of the main pan) - maybe they can be left off? Quick re-install of both small plastic pans/guards. Jacked the hitch up in place while balancing it on a small rolling jack (attempting the 1-person install). Can be done with 1 person! Two people would be faster/easier. Once I got it in the general location, I installed (finger tight) the 4, 12mm bolts/washers. Easy so far! Torqued them to spec as noted in the 1-page instructions. Next step required a drill. Found a drill that fit the remaining hole thru the hitch. Takes a 1/2" drill. I suspect mine was closer to 17/32 or 9/16". Whatever size it was, it was PERFECT! Tip that worked for me: Trying to drill thru the frame (using the hitch as the guide) can be tough, especially upside down in a fairly tight space. I used my rolling floor jack, supported the butt of the cordless drill on the jack & jacked it up to provide lite pressure while drilling. PERFECTION! The final step seems to cause the most grief & makes for the lower star ratings (which REALLY has nothing to do with the product itself). As you can see by my pictures, they include a 'fish wire' that is setup for this intended purpose & appears to be well thought out. The 'fish wire' attaches to the coil of the bolt to pull it thru a small opening. Took me less than 5 minutes to install BOTH bolts & here's what I did: Drill the holes (as noted above) Fish the wire, coil end first, thru the hole I just drilled & stuck my finger thru the access hole in the frame ~8-10" away to pull the coil thru. This is the access hole that the cartridge bolt & plate will pull thru. Holding on to the loose end of the wire protruding thru the freshly drilled hole, I slide the square washer over the coil end of the fish wire & into the hole in the frame. Gently screw the bolt to the coil (see pics below) till the bend in the coil touches the tip of the bolt. Gently pull the loose end of the wire while feeding the bolt into the hole in the frame. GENTLY pull on the fish wire & wiggle a little as needed till the bolt starts to come thru the hole. Twist the bolt a little till you fell the carriage head engage the plate. Gently unscrew the fish wire from the bolt while gently applying a little downward pressure to keep the bolt seated. Install the nut & torque to spec. Repeat on the other side. Total install time was about 1 hour! Hitch is SECURE. Sticker notes it is rated for 5000# towing & 9000# straight pull. Has two large pull rings. Happy with the install. Happy I chose this over the other, which based on other reviews notes you have to remove the skid plate/pan.
Scritto da: Ramble Tamble
With a little work/ lite fabrication it is installed
This receiver for a 2005 Tundra does not simply bolt on as there was a little bit of work to get it properly aligned and installed. First off the mounting brackets are welded or bent in towards each other to the point where you need to stretch them in order to align with bolt holes. I used a jack (I used a scissor jack but bottle jack would work too) & a 4x4 in between the two mounting brackets and stretched/ pried/ bent them a little to align. Now that it aligned I still had an issue with the skid plate clearance so I marked where the brackets interfered & made relief cuts with an air saw then bent the skid plate out of the way about 1/4 to 1/2 on each side then everything was cool & it installed like it should. This product would be 5 star if they could have just manufactured it fit (wouldn’t take much to have designed this better for install)

Prodotti correlati

Scopri il nostro network internazionale

Spediamo in 28 paesi, oltre 200.000 prodotti. Resta aggiornato, iscriviti alla newsletter.

Shopping Cart