Aqua-Pure Filtro acqua di ricambio per acqua potabile a flusso pieno sottolavello 3MFF101, per sistema Aqua-Pure 3MFF100, cambio rapido sanitario, riduce particelle e odori, COV selezionati, modello: 70020249663, cartuccia di ricambio bianca

Brand:Aqua-Pure

3.6/5

409.13

CERTIFICATO NSF STANDARD 42 e 53: Certificato per ridurre sedimenti, sapore e odore di cloro, cisti, piombo e COV selezionati da una delle organizzazioni di certificazione indipendenti più rispettate al mondo che aiuta a proteggere il cibo, l'acqua, i prodotti di consumo e l'ambiente del mondo. FILTRAZIONE A BLOCCHI DI CARBONIO: avanzato processo di filtrazione a triplo stadio per aiutare a fornire acqua potabile più pulita, più chiara e dal sapore migliore. CAMBIO RAPIDO SANITARIO (SQC): il design consente sostituzioni rapide e semplici senza dover contattare il materiale filtrante o la necessità di una chiave per filtri. FLUSSO COMPLETO: progettato per scorrere alla velocità del tuo rubinetto, fino a 2,5 galloni al minuto, riducendo al minimo la perdita di pressione dell'acqua comunemente osservata con l'utilizzo di filtri per l'acqua. ACQUA PIÙ PULITA: riduce il particolato, il sapore e l'odore di cloro, il piombo, le cisti protozoiche parassitarie e i composti organici volatili selezionati (VOC) come il benzene e il p-diclorobenzene. PROGETTATO PER L'USO CON il sistema di filtraggio dell'acqua potabile a flusso pieno sottolavello 3M Aqua-Pure 3MFF100.

CERTIFICATO NSF STANDARD 42 e 53: Certificato per ridurre sedimenti, sapore e odore di cloro, cisti, piombo e COV selezionati da una delle organizzazioni di certificazione indipendenti più rispettate al mondo che aiuta a proteggere il cibo, l'acqua, i prodotti di consumo e l'ambiente del mondo. FILTRAZIONE A BLOCCHI DI CARBONIO: avanzato processo di filtrazione a triplo stadio per aiutare a fornire acqua potabile più pulita, più chiara e dal sapore migliore. CAMBIO RAPIDO SANITARIO (SQC): il design consente sostituzioni rapide e semplici senza dover contattare il materiale filtrante o la necessità di una chiave per filtri. FLUSSO COMPLETO: progettato per scorrere alla velocità del tuo rubinetto, fino a 2,5 galloni al minuto, riducendo al minimo la perdita di pressione dell'acqua comunemente osservata con l'utilizzo di filtri per l'acqua. ACQUA PIÙ PULITA: riduce il particolato, il sapore e l'odore di cloro, il piombo, le cisti protozoiche parassitarie e i composti organici volatili selezionati (VOC) come il benzene e il p-diclorobenzene. PROGETTATO PER L'USO CON il sistema di filtraggio dell'acqua potabile a flusso pieno sottolavello 3M Aqua-Pure 3MFF100.
Country of Origin USA
Duration 12 months
External Testing Certification NSF
Is Discontinued By Manufacturer No
Item model number 70020249663
Item Weight 4 Pounds
Manufacturer 3M
Material Polypropylene
Product Dimensions 4.75 x 4.75 x 22.5 inches; 4 Pounds
Product Dimensions 4.75"D x 4.75"W x 22.5"H

3.6

9 Review
5 Star
78
4 Star
10
3 Star
4
2 Star
2
1 Star
6

Scrivi la tua recensione

La tua mail non sarà pubblicata. Tutti i campi obbligatori sono segnati con*

Scritto da: EdS
Excellent Filter - Read Installation Guidance in this Review
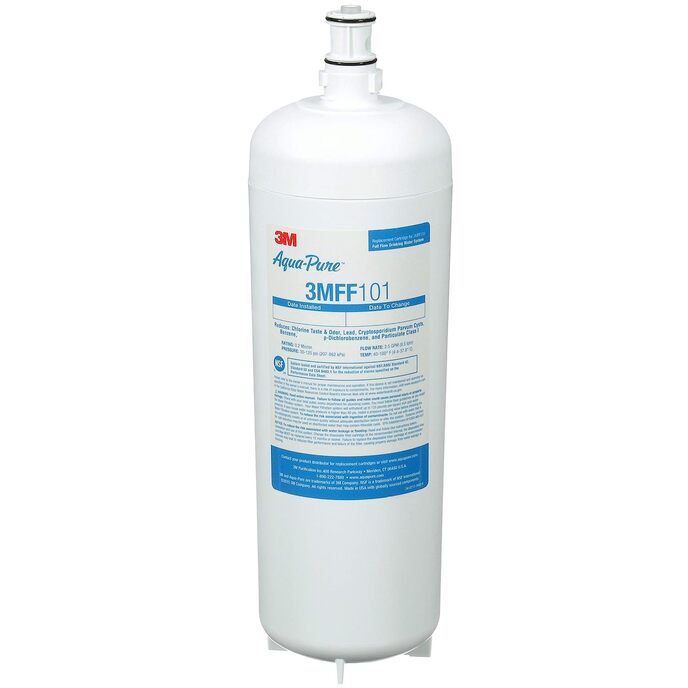
Excellent water filter. The filtered water tastes just like bottled water. I can say this because after installation we did a blind taste-test. My wife only drinks bottled water because she hates the taste of tap water, and she thought the water from the filter was the bottled water. Now we don't need to buy bottled water anymore. The filter is NSF certified so performance and specifications can be trusted. As expected, water flow from the sink faucet was reduced a bit since water is now going thru a filter, but it was not reduced significantly from 1.7 to 1.4 gal/min. The water flow is fine. The replacement filter cartridge uses a 1/4-turn quick-connect mechanism so it will be easy to replace in 1 yr (or 6,000 Gal). IMPORTANT INSTALLATION GUIDANCE: The filter is very easy to install. However, DO NOT install it as shown in the Installation Instructions that come with the filter or the 3M video that is found online. They both show Polyethylene Tube (i.e. Plastic Tube) being used to make the water connections, and we initially installed it that way but learned that there are several reasons not to use the tubing: 1) The main reason not to use the plastic tubing is the risk of a major water flood situation. This is because the coupling of the tubes into the compression fittings can be flaky since the tube is just pushed in and compressed. In our installation, one of the tubes popped out after 48 hours. Fortunately we were near the kitchen so we heard the water flow, and were able to quickly shut-off the water. In just a short amount of time, we had water all over the floors. If we hadn't been home, it would have been a major and expensive flooding disaster. 2) Other reasons are that there is a safer, cheaper, and easier way to install the filter. This installation uses standard braided water supply lines connected directly to the filter (see pictures). This is safer because all water connections are screwed-in so they cannot pop out. The installation is cheaper and easier because there are less parts and less connection points. A description of two filter installations with the list of parts required follows. 1st Installation to Faucet (Pictures 1 thru 3): --------------------------------------------------- The first filter was installed to feed a kitchen faucet. Parts required were purchased at HomeDepot: • Qty 2 of Everbilt Lead-Free Compression Adapter 3/8" OD x 3/8" MIP (Model #800669) $4.43/ea (Note: These fittings are used to connect the water supply lines to the filter. The MIP side of the fitting screws into filter head; one for the input and one for the output. You will unscrew and not use the pieces in the 3/8" OD side of the fitting because the supply lines will connect directly to the male end left after unscrewing the pieces). • Qty 1 of Oatey Fast Tape 1/2 in. x 260 in. PTFE Thread Seal Tape (Model #306212) $2.97 (Note: This is the teflon PTFE tape to wrap the 3/8" MIP end of the fitting that screws into filter head to make it leak proof. We wrapped it using 5 loops around. If the MIP connection develops a slow leak, the thing to do is to unscrew it and rewrap it with new PTFE tape and perhaps add one or more loops of tape. Trying to over tighten the fitting connection doesn't fix the leak. If you use the white PTFE tape that is very thin instead of this Oatey tape, you may not be able to stop the leak. We experienced this with one side of the filter, and wasted lots of time redoing it over and over. Online we read about people fixing leaks with higher-quality, thicker PTFE tape. We got the Oatey tape and wrapped it 5 times around the fitting, and it immediately fixed the leak. This tape is color grey). • Qty 1 of BrassCraft 3/8" Comp x 3/8" Comp x 20" Braided Polymer Dishwasher Connector (Model #B1-20DW F) $4.58 (Note: This is the water supply line to connect the filter to the incoming water valve at the wall. Only one water line is needed if you already had a line going from wall to faucet. That existing line will now go from the output of the filter to the faucet). 2nd Installation to Faucet & Ice Maker (Picture 4 with brass Tee-connector): -------------------------------------------------------------------------------------- We liked the filter so much that we got a second one. This one was installed to feed a faucet and an ice machine so the water needed to be diverted with a tee-connection. The ice machine was far from the sink so had to route a long water line on the back of the cabinets behind the drawers. In addition to the parts and installation done in the first two bullets of the 1st installation above, the following parts were ordered from Amazon: • Qty 1 of BrassCraft GIDDS-131737 Female Compression Tee, 3/8" Od x 3/8" Od x 1/4" Od, Lead Free $5.98 (Note: The 3/8" OD female side of this fitting was connected directly to the Everbilt compression adapter that is screwed to the filter head as described in the first bullet of the 1st installation above (see pic 4). The 3/8" OD male is connected to the water line going to the faucet. The 1/4" OD male is connected to the water line going to the ice maker. Since the two fittings attached together extend a pretty good amount from the filter head, the existing water line going to the faucet was creating strain. We got a longer and more flexible line to eliminate the unwanted strain; see below Fluidmaster B1F30) • Qty 1 of Certified Appliance IM180SS Braided Stainless Steel Ice Maker Connector (15-foot) $13.43 (Note: The ice maker line has 1/4" female compression fittings on both ends. One end hooks to the 1/4" OD in the compression tee, and the other end connects to the ice machine. There are other lengths in the Amazon listing). • Qty 1 of Fluidmaster B6F16 Faucet Connector, Braided Stainless Steel - 3/8" Female Compression Thread x 3/8" Female Compression Thread, 16" Length $4.29 (Note: This is the water supply line to connect the filter to the incoming water valve at the wall. There are other lengths in the Amazon listing. Only one water line is needed if you already had a line going from wall to faucet. That existing line will now go from the output of the filter to the faucet). • Qty 1 of Fluidmaster B1F30 Faucet Connector, Braided Stainless Steel - 3/8" Female Compression Thread x 1/2" I.P. Female Straight Thread, 30" Length $7.51 (Note: New longer line going to faucet to replace existing line).
Scritto da: Dr. Steve Brule
Checked with 3M - particles on cap and O-rings is normal and not a concern.
I don't normally write reviews, but felt like it was needed since a recent review implied that the brown/yellow debris on the O-rings and inside the red cap meant that the product was unsanitary. I found out that this is not the case. I also received a filter that had this debris but I checked with 3M quality control to see what they had to say. I was told by 3M that this is common and it is actually some of the filtering media that sometimes gets on the outside of the filter during the manufacturing process. I was told I could either wipe it off or leave it on since it'd just get caught by the filter. I opted to first wipe off the debris with a wet paper towel and then used compressed air to make sure the rings were clean. I then used water to moisten the rings per the installation instructions. I installed it using braided hoses per other reviewer's guidance and it works great so far - no leaks and no weird sounds. Water pressure seems to be slightly less than normal but that is expected.
Scritto da: Amazon Customer
Removes chloriney chemical flavor, but tricky plumbing
We recently moved into a home where the municipal water treatment left a quite chemically taste to me; the flavor was somewhere in between chlorine pool and new plastic plumbing. The great news is this filter really has eliminated that perception. I did a highly unscientific non-blinded taste test before and after flushing the filter and the difference is very apparent. In contrast, the plumbing of this filter is somewhat frustrating. I was mostly able to follow the highest rated reviewer's suggestion of 3/8 inch MIP to Comp fittings along with a length of 3/8 inch comp to 3/8 inch comp hosing. However, the stores near me only had incredibly long (4 ft or more) sections of this labeled as dishwasher or "universal" hose. Had to order a shorter length online, and Amazon actually had a 16 inch stainless braid that fit my setup nicely. But stainless braid is less flexible than you might personally need.l to avoid kinking. I definitely recommend this 3M filter if you don't mind or even perversely enjoy small/minor plumbing adventures.
Scritto da: Kevin
It looks good and tastes good.
Got tired of Sparklettes overcharging and refusal to cancel but I think I finally shook 'em. I looked at the ANSI ratings and this one is ANSI 42 and 53 . Easy to Google search and read to your hearts content. For the real test I filled two glasses . I posted a picture of The Aqua Pure on the left and Camarillo tap water on the right. I used swimming pool test strips . I also asked my teenager with good eyes to look at and taste the samples . He chose the 3M over the tap. The test strips show an approximate range by color change on the tiny squares located on the strip. The second and third squares are for chlorine . Green equals chlorine . The filter removed the chlorine . The 4th square ,the red one is PH level. I'm not sure if its possible but the sample on the left ,the filter sample, seems to show a higher PH level . It also seems a higher alkalinity on the filtered water from the test strip indication. The pressure is easily 2.5 gallons per minute . I hooked up a dedicated faucet just for the filtered water and its very fast filling the coffee pot. This model claims one can hook it up straight to the kitchen sink but we chose to separate the feeds. No leaks at the connection points with threaded fittings and teflon tape. The bracket that holds the filter seems sturdy and easy to install. The water definitely tastes better and looks cleaner. Take the bracket with you to the store to get the right hoses. Not the tank but the tank connection bracket . It's smaller and has all the info a helpful hardware person would need to set you up properly.
Scritto da: Flavio Costa
Easy to install, but...
Easy to install, but not so easy to understand what you need if you are a plumbing dummy like myself. Following the advice on other reviews, I ignored the included instructions on how to install it using plastic tubing. This is what I needed to have / to buy from a home renovation store to connect the filter to my kitchen faucet: * Wrench * Power drill or screwdriver * Pen or permanent marker * PTFE tape * Compression adapter 3/8" OD x 3/8" MIP, two of them * Braided stainless steel connector, 3/8" First step is to close the valve from the cold water supply and open the faucet to relieve the pressure (to make sure the pipes are empty). You may then use the wrench to disconnect the flex connector from the faucet to the water supply. Next step is to prepare the filter head assembly. Take the compression adapters, wrap the threads on the Male Iron Pipe (i.e. MIP) end with the PTFE tape to prevent leaks, and then screw the adapters on both ends of the filter head. The result is in the first picture. Tips: The compression adapter must always be "3/8 MIP" at one end, as this is the dimension that screws properly into the filter head. The other end would be whatever fits your pipes/connectors, but for a faucet installation it is normally a 3/8" Outside Diameter (i.e OD). Therefore, in this scenario you need 3/8" OD x 3/8" MIP compression adapters such as the Sioux Chief LFA-123 909-40101601 you see in the picture. You may also notice that we don't need all the small parts included in the bag, just leave the remaining ones aside. You also want to ensure that your adapters are marked "lead-free"; you are installing a filter that removes lead from the water, so obviously you don't want your installation to reinsert lead into your drinking water! Third step is to connect the cold water supply to your filter using the braided stainless steel connector you bought. It goes into the lower connector in the filter head - the one with a small arrow pointing inwards. You may now also connect the existing faucet flex connector to the other end of the filter head (the one with the arrow pointing outwards), or at least check its length to choose a suitable position for the filter under your counter. Tips: These braided stainless steel connectors are normally used to install dishwashers, faucets and ice makers. Make sure that the length is sufficient to reach the position you will put the filter (you might need anything between 20" and 60" or more) and that connections are 3/8" on both ends (the ones for dishwashers often have 1/2" at one end, while the ones for ice makers usually are 1/4" at both ends). Fourth step is to attach the filter head support to the cabinet. Take the head and use a permanent marker to indicate the position for the screws, they come with the filter in a small plastic bag. The two included tiny internal tooth lock washers go between your vertical cabinet surface and the screw head. Don't drive your screws until the head touches the surface, you should leave a gap so you can easily fit them through the keyhole mounting slots in the filter head. If you want a more stable installation, you can finally secure the head using the third screw through the middle lower round mounting hole. Tip: the keyhole mount require some vertical space to work, so don't put the head too high so it doesn't fit under the sink, nor make it too low so the filter cartridge will be hard to remove or replace. Do some tests before tightening the screws to make sure the chosen position works well. Last step, just review all connections to make sure they are tight and secured, and then install the filter cartridge. The second picture shows how the finalized install looks like. Now open the faucet (cold water only), letting it run for at least 2 minutes. I would recommend waiting a bit and then letting the water run again for some extra couple of minutes, as I could still feel some mineral aftertaste in the water after just the 2 minutes recommended by the manufacturer. There you go, abundant, well-filtered cold water right from your kitchen faucet! You will notice that the cold water flow may be slightly slower than the hot water, but the cold water flow is still very reasonable so I'd say that the manufacturer's claim to be a "full flow filtration system" is fairly accurate.
Scritto da: marcus
customer service lied to me
After I bought it, I saw a message saying that this product needs to prepare some other tools to install it. Then I saw that the cover image was really the case. I immediately asked the online customer about this situation. I repeatedly ask if additional tools are required to install? I ask, please let me know if you need pre-prepared tools. I can prepare in advance. I asked many times during the process. And the message said that tools and parts need to be prepared in advance. The customer service staff all told me that all the needed tools are in the package. I love 3M. Have confidence in 3M's products. First instructions, and finally I successfully installed. When I received the goods, I knew I had been deceived. I promised a friend to install it today and finish it today, but honestly, it's really not easy for a layman. I just finished installing it after I received it. I read the manual, but it's a little hard to understand. I took the manual to the homedepot and bought the tools and parts I needed one by one. Finally, watch the installation tutorial repeatedly on youtube and then complete the installation. It took half a day. I feel angry and disappointed. ref: total extra cost ~30 CAD & half-day time
Scritto da: Jim
Things to take note
The filter head does not come with the Push-In Fittings at both end (inlet and outlet) and therefore you have to purchase the 2 fittings from https://www.amazon.com/John-Guest-Speedfit-PP011223W-Connector/dp/B003YKF17U.
Scritto da: Law Guy
Delicious!
I used to have the smaller 3M filter and recently upgraded to this one. Which is huge, by the way! The water just tastes "pure", for lack of a better word. Almost similar to distilled water, but not as bitter. Bought one for the kitchen and one for the bathroom. ...now if only they were a little cheaper!
Scritto da: Rob
Filters well
Use as a full system water filter in the motorhome.

Prodotti correlati

hot
Filtro al carbone Pentek 255679-43
3/5

€ 28.75

Filtro al carbone Pentek 255679-43
3/5

€ 28.75

Scopri il nostro network internazionale

Spediamo in 28 paesi, oltre 200.000 prodotti. Resta aggiornato, iscriviti alla newsletter.

Shopping Cart